➮ HP PrecisionScan Pro User’s Guide 1 Using the HP ScanJet scanner 2 A tour of the scanning software 3 Scanning pictures 4 Adjusting images of pictures 5 Scanning text 6 Saving scanned images 7 Scanning 35mm slides ➤ Index
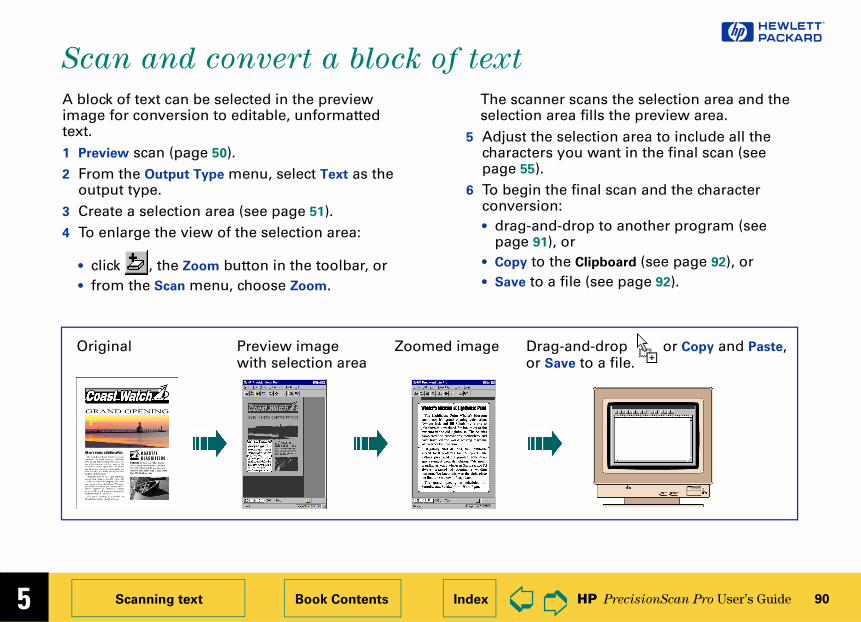
Transcript
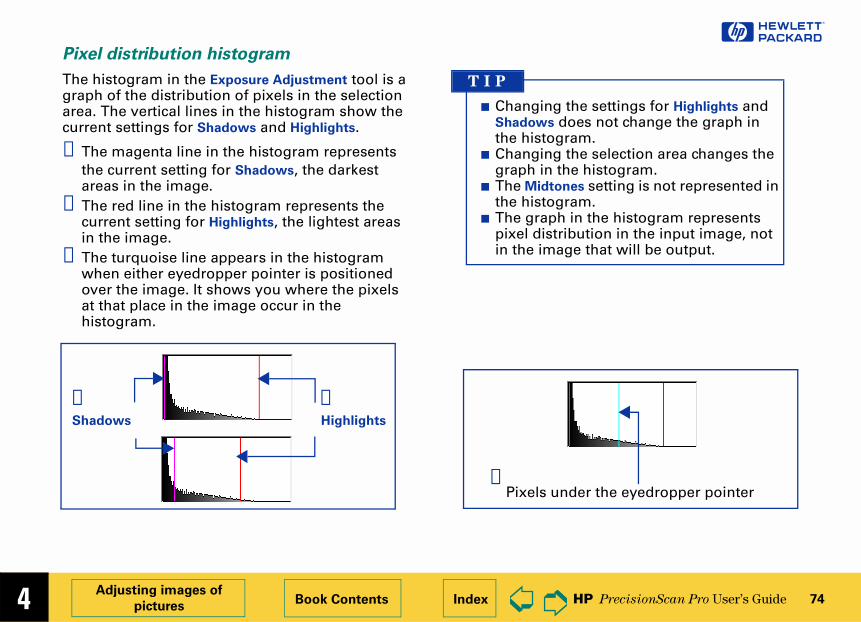
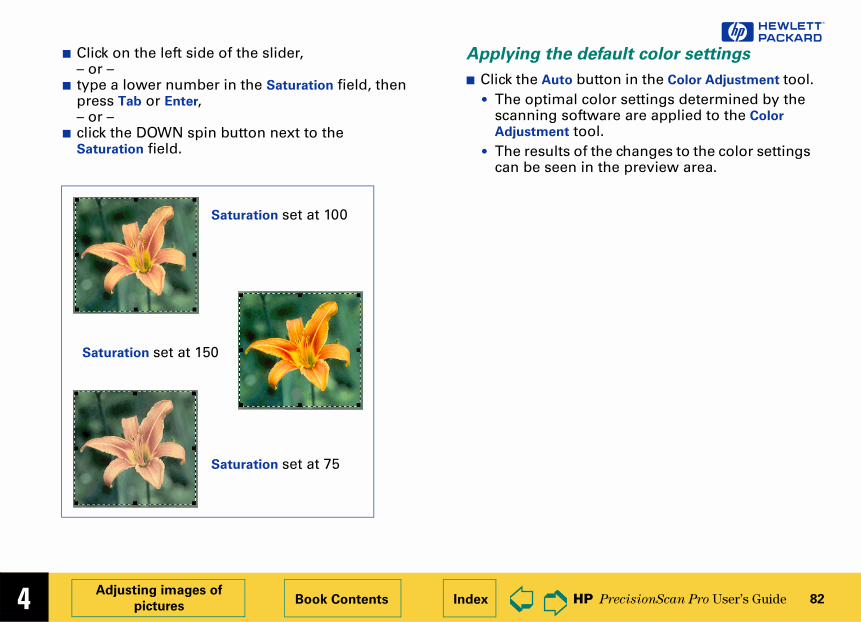
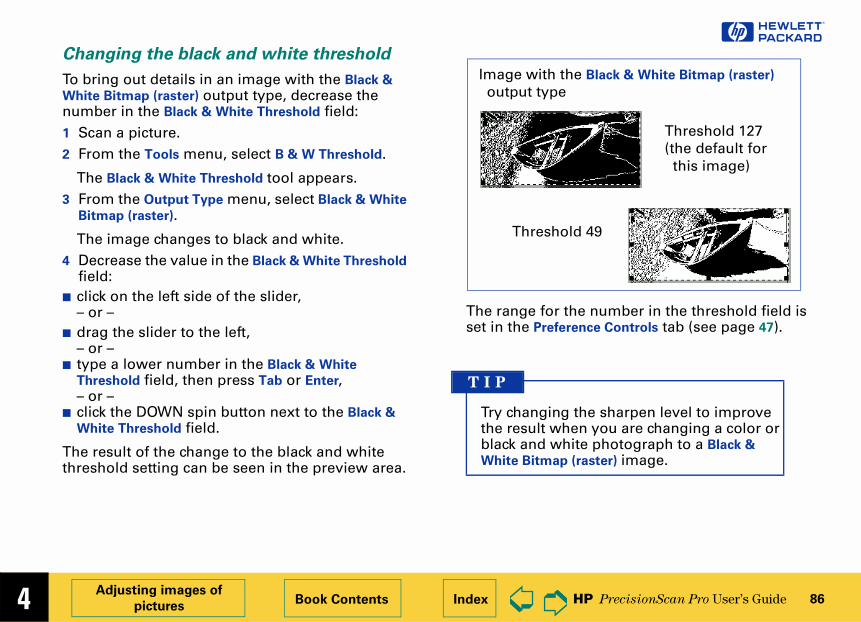
�
Scan ProUser’s Guide
the HP ScanJet scanner
r of the scanning software
ing pictures
ting images of pictures
ing text
g scanned images
ing 35mm slides
➮
HP Precision
1 Using
2 A tou
3 Scann
4 Adjus
5 Scann
6 Savin
7 Scann
➤ Index
�
HP PrecisionScan Pro User’s Guide 2
Book Contents Index
➮
➮
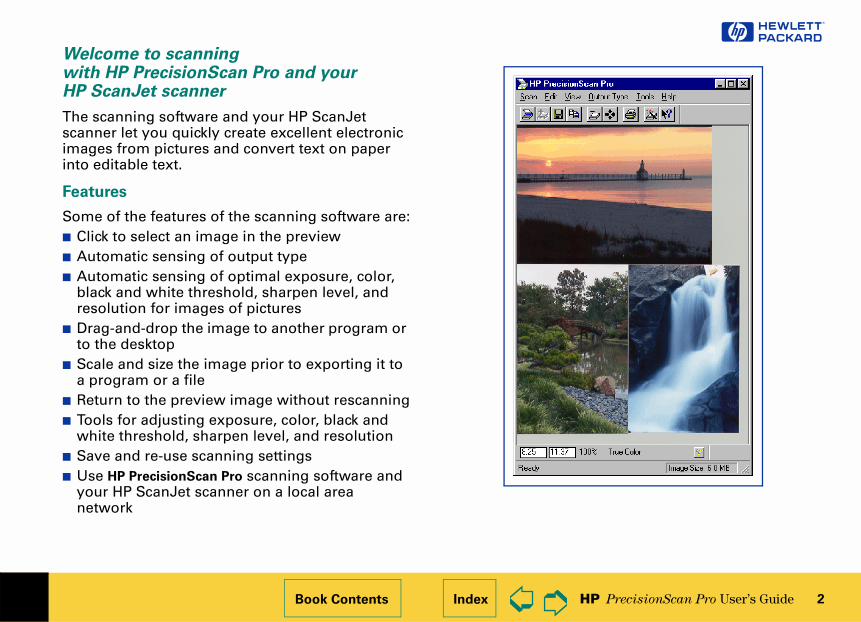
Welcome to scanning with HP PrecisionScan Pro and your HP ScanJet scanner
The scanning software and your HP ScanJet scanner let you quickly create excellent electronic images from pictures and convert text on paper into editable text.
Features
Some of the features of the scanning software are:■ Click to select an image in the preview■ Automatic sensing of output type■ Automatic sensing of optimal exposure, color,
black and white threshold, sharpen level, and resolution for images of pictures
■ Drag-and-drop the image to another program or to the desktop
■ Scale and size the image prior to exporting it to a program or a file
■ Return to the preview image without rescanning■ Tools for adjusting exposure, color, black and
white threshold, sharpen level, and resolution■ Save and re-use scanning settings■ Use HP PrecisionScan Pro scanning software and
your HP ScanJet scanner on a local area network
�
HP PrecisionScan Pro User’s Guide 3
Microsoft is a U.S. registered trademark of Microsoft Corporation.
No matter where you are or when you need it, HP support is there to help you get the most from your HP products. Whether it’s making products easier to use or providing you with innovative new ways to tackle your important projects, HP support helps you become a confident and creative user. If you do encounter a problem with your HP product, don’t worry. HP support delivers fast, accurate solutions that won’t rob you of either your product or your valuable time.
When you’re ready to get started, check out HP’s Web site,
http://www.scanjet.hp.com
for great ideas and quick tips on how to use your HP product in fun new ways.
RESTRICTED RIGHTS LEGENDU.S. Government Restricted Rights. The Software and any accompanying documentation have been developed entirely at private expense. They are delivered and licensed as “commercial computer software” as defined in DFARS 252.227-7013 (Oct 1988), DFARS 252.211-7015 (May 1991) or DFARS 252.227-7014 (Jun 1995), as a “commercial item” as defined in FAR 2.101(a), or as “Restricted computer software” as defined in FAR 52.227-19 (Jun 1987) (or any equivalent agency regulation or contract clause), whichever is applicable. You have only those rights provided for such Software and any accompanying documentation by the applicable FAR or DFARS clause or the HP standard software agreement for the product involved.
First Edition, 1998
�
HP PrecisionScan Pro User’s Guide 4
p
the toolbar,
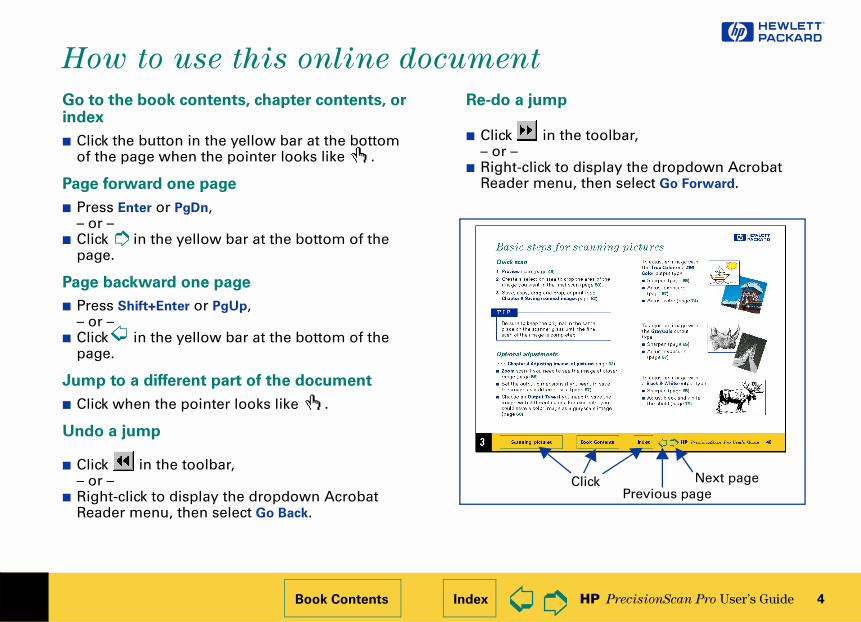
o display the dropdown Acrobat u, then select Go Forward.
Previous pageNext pageClick
Book Contents Index
➮
➮
How to use this online document
Go to the book contents, chapter contents, or index
■ Click the button in the yellow bar at the bottom of the page when the pointer looks like .
Page forward one page
■ Press Enter or PgDn, – or –
■ Click in the yellow bar at the bottom of the page.
Page backward one page
■ Press Shift+Enter or PgUp,– or –
■ Click in the yellow bar at the bottom of the page.
Jump to a different part of the document
■ Click when the pointer looks like .
Undo a jump
■ Click in the toolbar, – or –
■ Right-click to display the dropdown Acrobat Reader menu, then select Go Back.
pictures 48 for scanning pictures 49an 50lection area 51 56he preview image (Undo Zoom) 57tput dimensions 58 output type 62
images of pictures 65aking adjustments 66
68
Book Contents Index
➮
➮
ContentsHow to use this online document 4
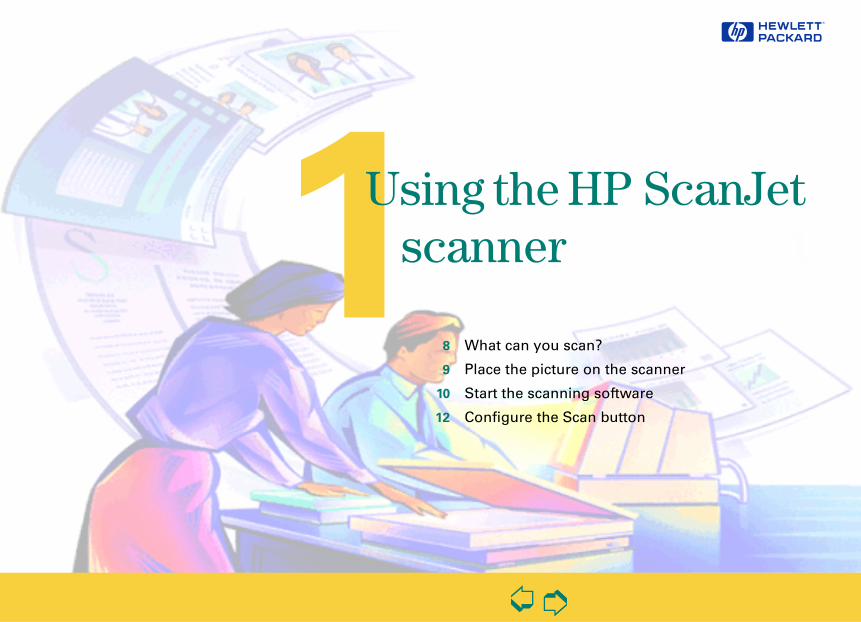
1 Using the HP ScanJet scanner 7What can you scan? 8Place the picture on the scanner 9Start the scanning software 10Configure the Scan button 12
2 A tour of the scanning software 13Scanning software window 14Context-sensitive pointers 24Image adjustment tools 26Output Resolution tool 27Sharpen Level tool 29Dimensions tool 30Exposure Adjustment tool 32Color Adjustment tool 33
Black & WOnline HelSave and rSet prefere
3 ScanningBasic stepsPreview scCreate a seZoom scanReturn to tSet the ouChoose an
4 AdjustingTools for mSharpen
�
HP PrecisionScan Pro User’s Guide 6
Book Contents Index
➮
➮
Adjust exposure 70Adjust color 80Set output resolution 83Set threshold for black and white bitmaps 85Set color channel for black and white
bitmaps 87
5 Scanning text 89Scan and convert a block of text 90Scan a whole page 93
6 Saving scanned images 94How you can use the image 95Print the image 96Drag-and-drop to another program 97Drag-and-drop to the Desktop 98Copy to the Clipboard 99Save to a file 100
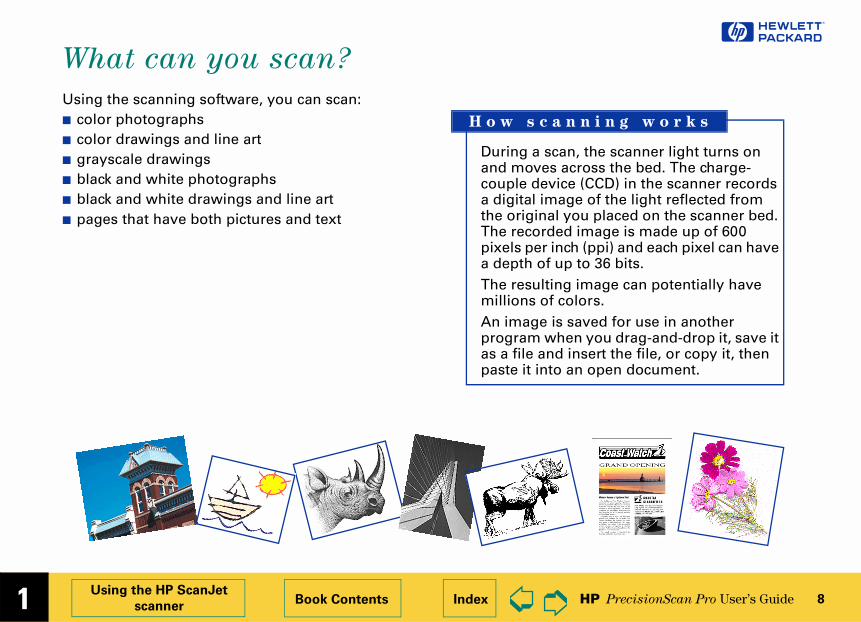
an, the scanner light turns on across the bed. The charge-ce (CCD) in the scanner records age of the light reflected from you placed on the scanner bed. d image is made up of 600 ch (ppi) and each pixel can have p to 36 bits.g image can potentially have
colors. saved for use in another en you drag-and-drop it, save it insert the file, or copy it, then an open document.
n n i n g w o r k s
Using the HP ScanJet
scannerBook Contents Index
➮
➮
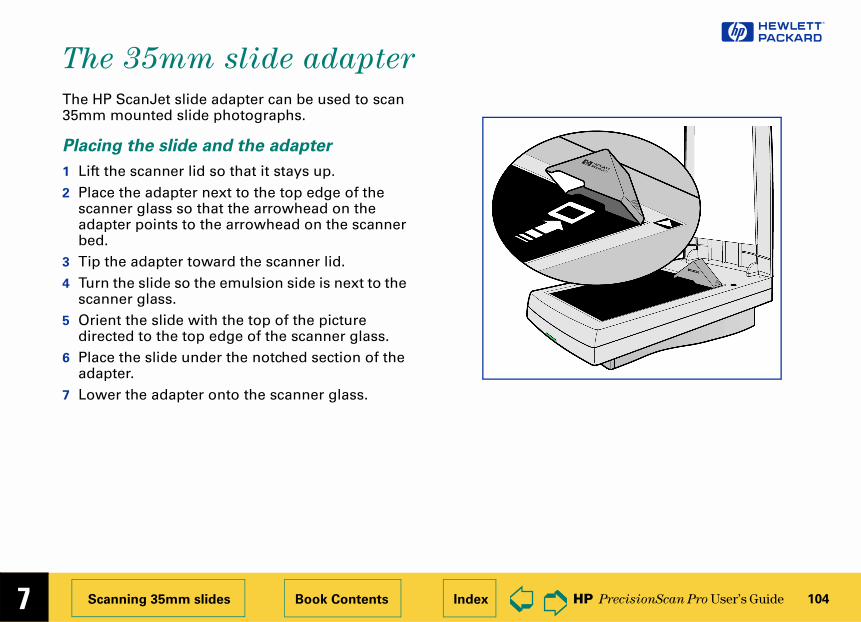
What can you scan?
Using the scanning software, you can scan:■ color photographs■ color drawings and line art■ grayscale drawings■ black and white photographs■ black and white drawings and line art■ pages that have both pictures and text
During a scand moves couple devia digital imthe originalThe recordepixels per ina depth of uThe resultinmillions of An image isprogram whas a file andpaste it into
H o w s c a
�
1 HP PrecisionScan Pro User’s Guide 9
e ss.
.
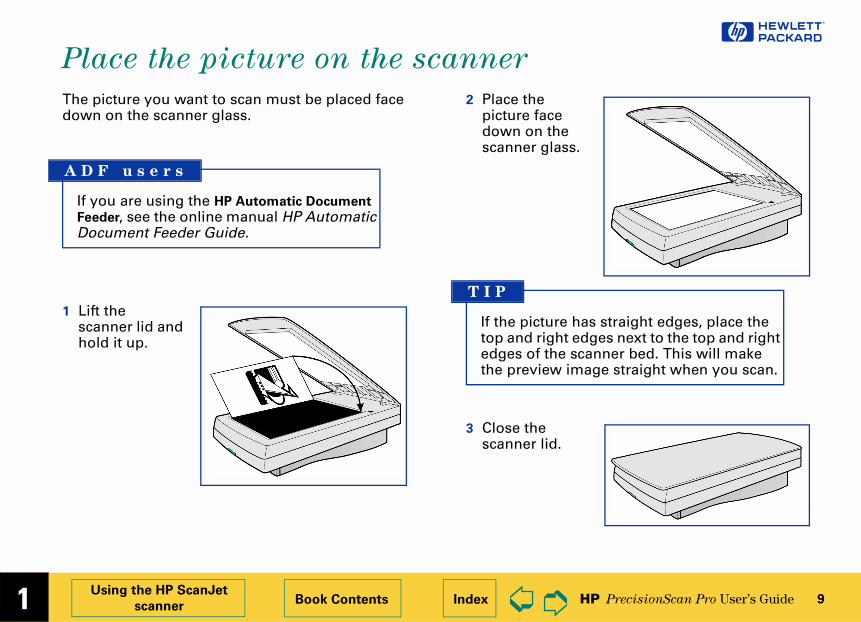
e has straight edges, place the t edges next to the top and right
e scanner bed. This will make image straight when you scan.
Using the HP ScanJet
scannerBook Contents Index
➮
➮
Place the picture on the scanner
The picture you want to scan must be placed face down on the scanner glass.
1 Lift the scanner lid and hold it up.
2 Place the picture facedown on thscanner gla
3 Close the scanner lid
If you are using the HP Automatic Document
Feeder, see the online manual HP Automatic Document Feeder Guide.
A D F u s e r s
If the picturtop and righedges of ththe preview
T I P
�
1 HP PrecisionScan Pro User’s Guide 10
indows Start menu
, the Windows Start button.
s Start menu appears.art menu, choose Programs, then canJet Software:HP PrecisionScan Pro.
canning software window appears, does not automatically perform a n. eview scan:
e Preview button in the scanning ndow toolbar, or
ed to use the HP ScanJet Button
configure the Scan button to set Scan Pro as the default software hen the Scan button is pushed 2).
Using the HP ScanJet
scannerBook Contents Index
➮
➮
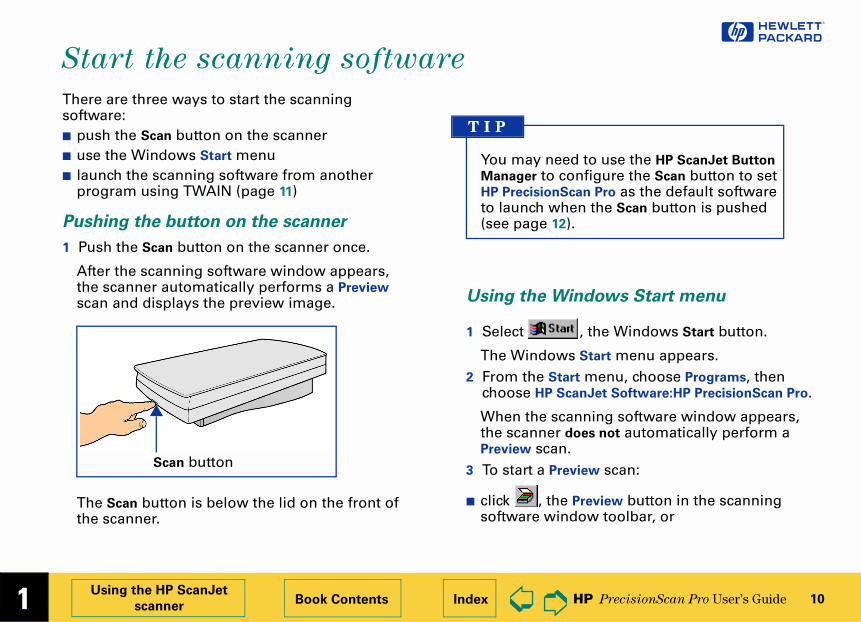
Start the scanning software
There are three ways to start the scanning software:■ push the Scan button on the scanner■ use the Windows Start menu■ launch the scanning software from another
program using TWAIN (page 11)
Pushing the button on the scanner
1 Push the Scan button on the scanner once.
After the scanning software window appears, the scanner automatically performs a Preview scan and displays the preview image.
The Scan button is below the lid on the front of the scanner.
Using the W
1 Select
The Window2 From the St
choose HP S
When the sthe scannerPreview sca
3 To start a Pr
■ click , thsoftware wi
Scan button
You may neManager to HP Precision
to launch w(see page 1
T I P
�
1 HP PrecisionScan Pro User’s Guide 11
n industry-standard tions protocol for sending to hardware (such as a scanner) g data back (such as an image).
sing a program that supports can start HP PrecisionScan Pro that program.
et scanners and HP scanning can use TWAIN, but the you use to create projects may AIN-compatible.
am can use TWAIN, it should mmand named Acquire, Acquire
Import on one of its main sually the File menu. one of these commands the scanning software selected elect Source command.ext cannot be transferred using
T W A I N ?
Using the HP ScanJet
scannerBook Contents Index
➮
➮
■ from the Scan menu, select Preview, or■ press Ctrl+R.
The scanner performs a Preview scan and displays the preview image.
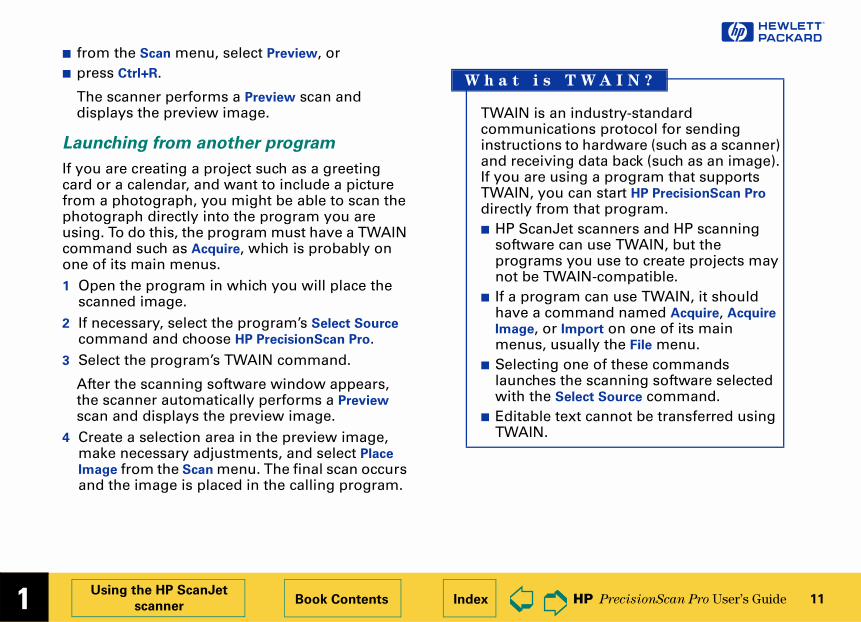
Launching from another program
If you are creating a project such as a greeting card or a calendar, and want to include a picture from a photograph, you might be able to scan the photograph directly into the program you are using. To do this, the program must have a TWAIN command such as Acquire, which is probably on one of its main menus.1 Open the program in which you will place the
scanned image.2 If necessary, select the program’s Select Source
command and choose HP PrecisionScan Pro.3 Select the program’s TWAIN command.
After the scanning software window appears, the scanner automatically performs a Preview scan and displays the preview image.
4 Create a selection area in the preview image, make necessary adjustments, and select Place
Image from the Scan menu. The final scan occurs and the image is placed in the calling program.
TWAIN is acommunicainstructionsand receivinIf you are uTWAIN, youdirectly from■ HP ScanJ
software programsnot be TW
■ If a progrhave a coImage, or menus, u
■ Selectinglaunches with the S
■ Editable tTWAIN.
W h a t i s
�
1 HP PrecisionScan Pro User’s Guide 12
cisionScan Pro in the list box., click the Enable the Scan button place a checkmark in it.
Jet Button Manager window closes.
Using the HP ScanJet
scannerBook Contents Index
➮
➮
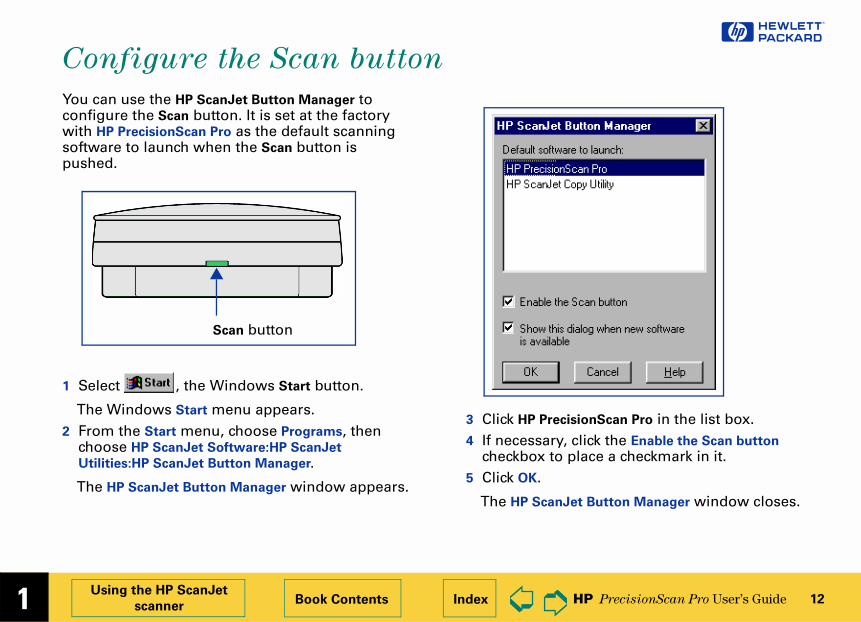
Configure the Scan button
You can use the HP ScanJet Button Manager to configure the Scan button. It is set at the factory with HP PrecisionScan Pro as the default scanning software to launch when the Scan button is pushed.
1 Select , the Windows Start button.
The Windows Start menu appears.2 From the Start menu, choose Programs, then
choose HP ScanJet Software:HP ScanJet
Utilities:HP ScanJet Button Manager.
The HP ScanJet Button Manager window appears.
3 Click HP Pre
4 If necessarycheckbox to
5 Click OK.
The HP Scan
Scan button
�
the software2
posure Adjustment tool
lor Adjustment tool
ack & White Threshold tool
nline Help
ve and re-use adjustment settings
t preferences
2➮
➮
A tour of scanning
14 Scanning software window 32 Ex
24 Context-sensitive pointers 33 Co
26 Image adjustment tools 34 Bl
27 Output Resolution tool 35 O
29 Sharpen Level tool 38 Sa
30 Dimensions tool 41 Se
�
2 HP PrecisionScan Pro User’s Guide 14
ndow showing a Preview scan
A tour of the scanning
softwareBook Contents Index
➮
➮
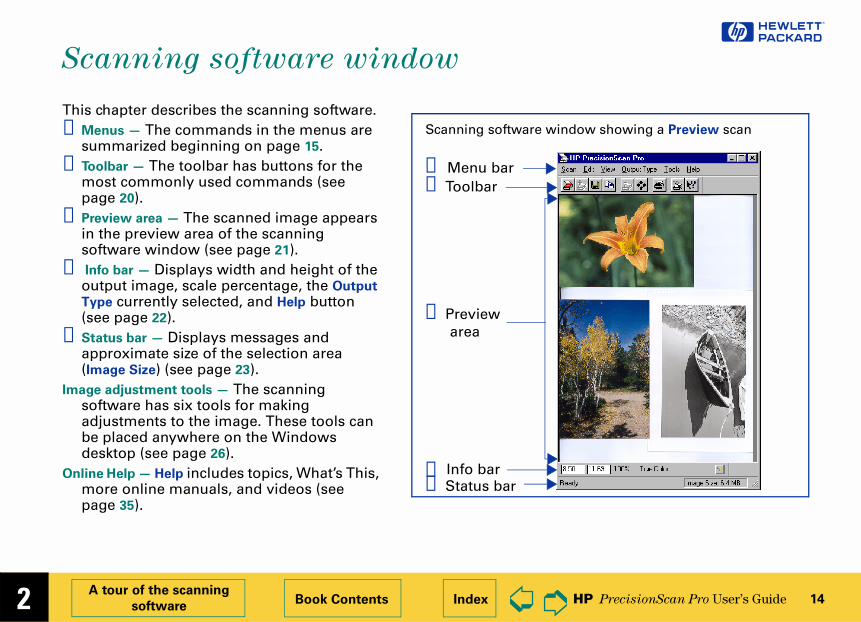
Scanning software window
This chapter describes the scanning software.➊ Menus — The commands in the menus are
summarized beginning on page 15.➋ Toolbar — The toolbar has buttons for the
most commonly used commands (see page 20).
➌ Preview area — The scanned image appears in the preview area of the scanning software window (see page 21).
➍ Info bar — Displays width and height of the output image, scale percentage, the Output
Type currently selected, and Help button (see page 22).
➎ Status bar — Displays messages and approximate size of the selection area (Image Size) (see page 23).
Image adjustment tools — The scanning software has six tools for making adjustments to the image. These tools can be placed anywhere on the Windows desktop (see page 26).
Online Help — Help includes topics, What’s This, more online manuals, and videos (see page 35).
➊ Menu bar➋ Toolbar
➌ Preview
➎ Status bar
area
Scanning software wi
➍ Info bar
�
2 HP PrecisionScan Pro User’s Guide 15
at low resolution and displays
ion area (see page 56).s the selection area and saves
an image containing text or a F file (see page 93).age to the TWAIN-compatible
aving a set of scanning settings
oading a set of saved scanning
he selection area and sends the
ting options for printing.es dialog box for setting e page 41).
A tour of the scanning
softwareBook Contents Index
➮
➮
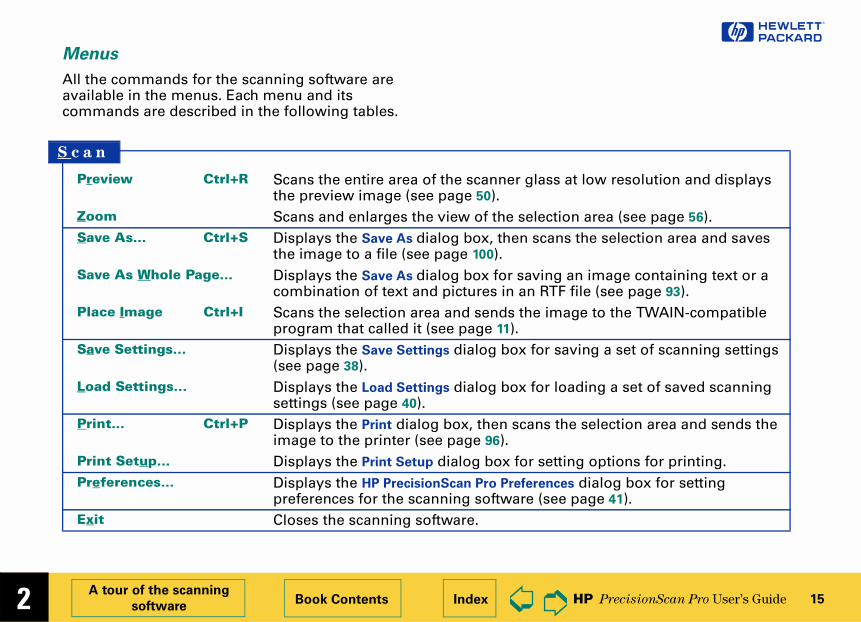
Menus
All the commands for the scanning software are available in the menus. Each menu and its commands are described in the following tables.
Preview Ctrl+R Scans the entire area of the scanner glassthe preview image (see page 50).
Zoom Scans and enlarges the view of the selectSave As... Ctrl+S Displays the Save As dialog box, then scan
the image to a file (see page 100).Save As Whole Page... Displays the Save As dialog box for saving
combination of text and pictures in an RTPlace Image Ctrl+I Scans the selection area and sends the im
program that called it (see page 11).Save Settings... Displays the Save Settings dialog box for s
(see page 38).Load Settings... Displays the Load Settings dialog box for l
settings (see page 40).Print... Ctrl+P Displays the Print dialog box, then scans t
image to the printer (see page 96).Print Setup... Displays the Print Setup dialog box for setPreferences... Displays the HP PrecisionScan Pro Preferenc
preferences for the scanning software (seExit Closes the scanning software.
S c a n
�
2 HP PrecisionScan Pro User’s Guide 16
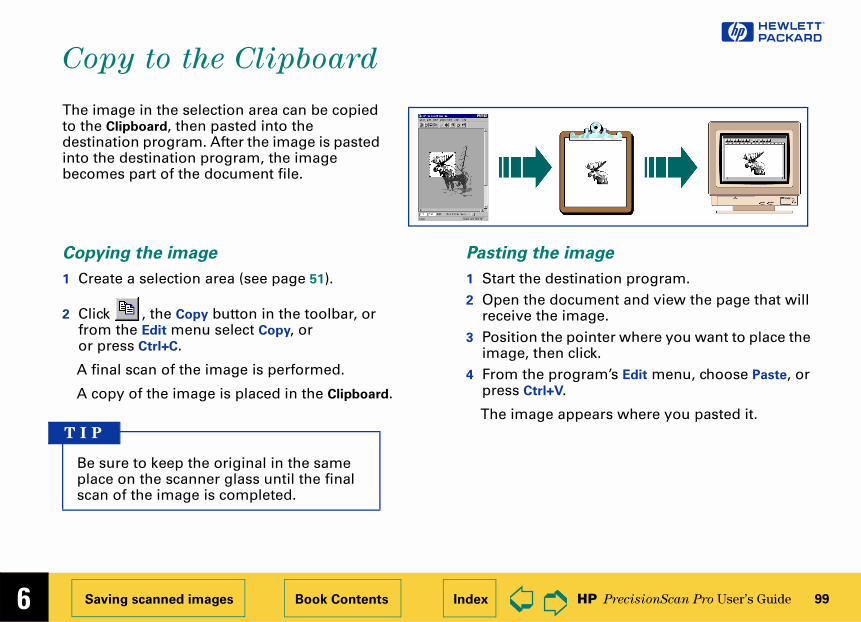
d copies it to the m (see page 99).
ntire area of the
d, hides the toolbar
cked, hides the status
ed, hides the info bar
g preview image so forming a new Preview
A tour of the scanning
softwareBook Contents Index
➮
➮
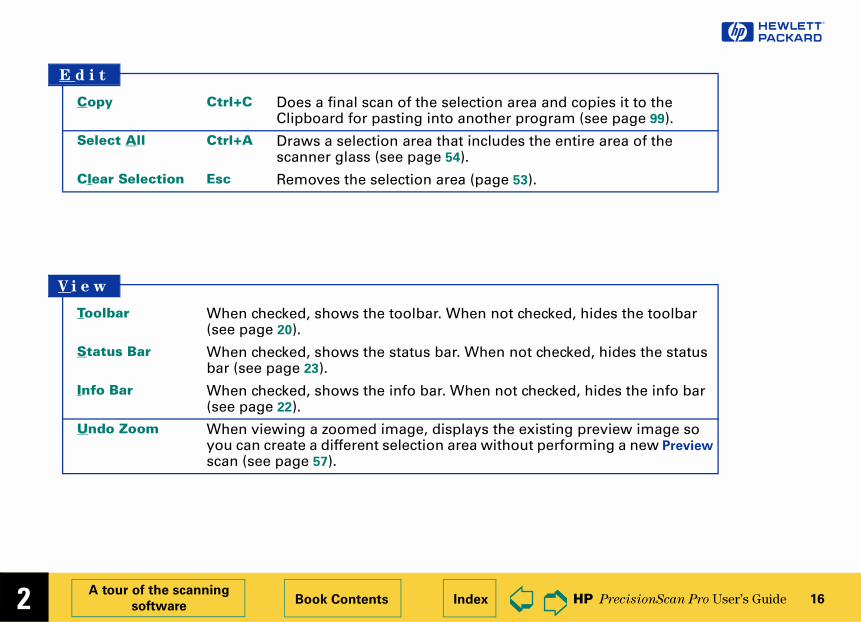
Copy Ctrl+C Does a final scan of the selection area anClipboard for pasting into another progra
Select All Ctrl+A Draws a selection area that includes the escanner glass (see page 54).
Clear Selection Esc Removes the selection area (page 53).
E d i t
Toolbar When checked, shows the toolbar. When not checke(see page 20).
Status Bar When checked, shows the status bar. When not chebar (see page 23).
Info Bar When checked, shows the info bar. When not check(see page 22).
Undo Zoom When viewing a zoomed image, displays the existinyou can create a different selection area without perscan (see page 57).
V i e w
�
2 HP PrecisionScan Pro User’s Guide 17
7).
age (see page 67).
mage that can be quality (see page 67).
Web palette
lor Web Palette output VGA colors
hat contains pixel
unformatted, editable
A tour of the scanning
softwareBook Contents Index
➮
➮
True Color Scans the selection in 24-bit color (see page 66).Grayscale Scans the selection in 8-bit grayscale (see page 6
Black & White
Bitmap (raster) Scans the selection as a black and white raster imScalable (vector) Scans the selection as a black and white vector i
resized in another program without losing image256 Color
Web Palette Scans the selection using colors from a standard(see page 62).
System Palette Scans the selection using colors from the 256 Co
type palette plus more shades of gray and the 16(see page 64).
Optimized Palette Scans the selection using colors from a palette tcolors present in the original (see page 63).
Text Scans a text selection and changes the text into ASCII text (see page 90).
O u t p u t T y p e
�
2 HP PrecisionScan Pro User’s Guide 18
tool, which sets the resolution 27 and 83).
, which sets the amount of 68).
hich contains fields for setting caling, and setting the width rinted, copied, or dragged and
nt tool, which sets highlights, splays pixel distribution, pixel nd 70).
ool, which sets color balance pages 33 and 80).
shold tool, which sets the e set to the Black & White
and 87).
mensions tool, to their optimal
e for all output types.
A tour of the scanning
softwareBook Contents Index
➮
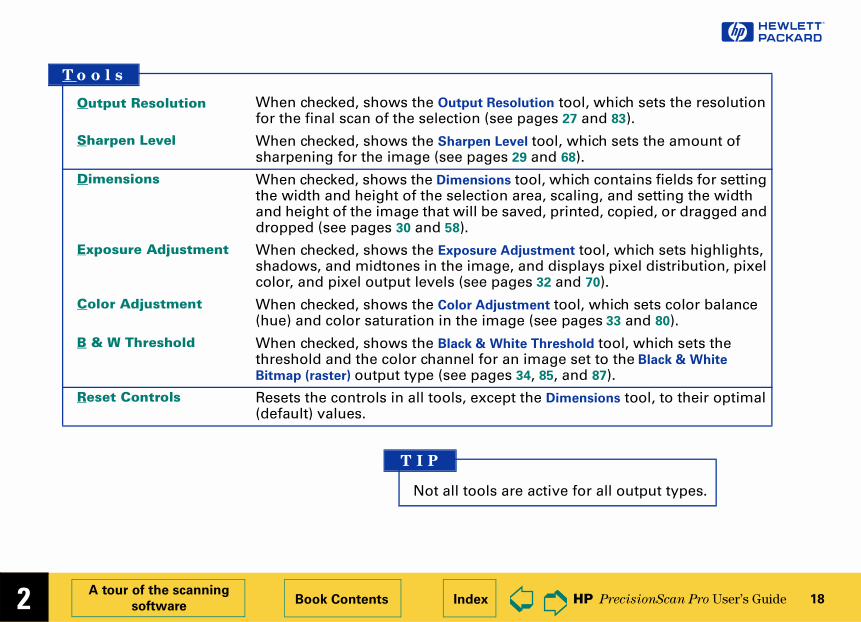
➮
Output Resolution When checked, shows the Output Resolution for the final scan of the selection (see pages
Sharpen Level When checked, shows the Sharpen Level toolsharpening for the image (see pages 29 and
Dimensions When checked, shows the Dimensions tool, wthe width and height of the selection area, sand height of the image that will be saved, pdropped (see pages 30 and 58).
Exposure Adjustment When checked, shows the Exposure Adjustme
shadows, and midtones in the image, and dicolor, and pixel output levels (see pages 32 a
Color Adjustment When checked, shows the Color Adjustment t(hue) and color saturation in the image (see
B & W Threshold When checked, shows the Black & White Thre
threshold and the color channel for an imagBitmap (raster) output type (see pages 34, 85,
Reset Controls Resets the controls in all tools, except the Di
(default) values.
Not all tools are activ
T I P
T o o l s
�
2 HP PrecisionScan Pro User’s Guide 19
ning with age 36).
ox for Contents, Index,
Pro Help (see page 35).
elp pointer for a tool, field, button,
5).
HP PrecisionScan Pro e the main features of e page 36).
recisionScan Pro eader (see page 37).
utomatic Document eader (see page 37).
can Pro software
omatically installed
A tour of the scanning
softwareBook Contents Index
➮
➮
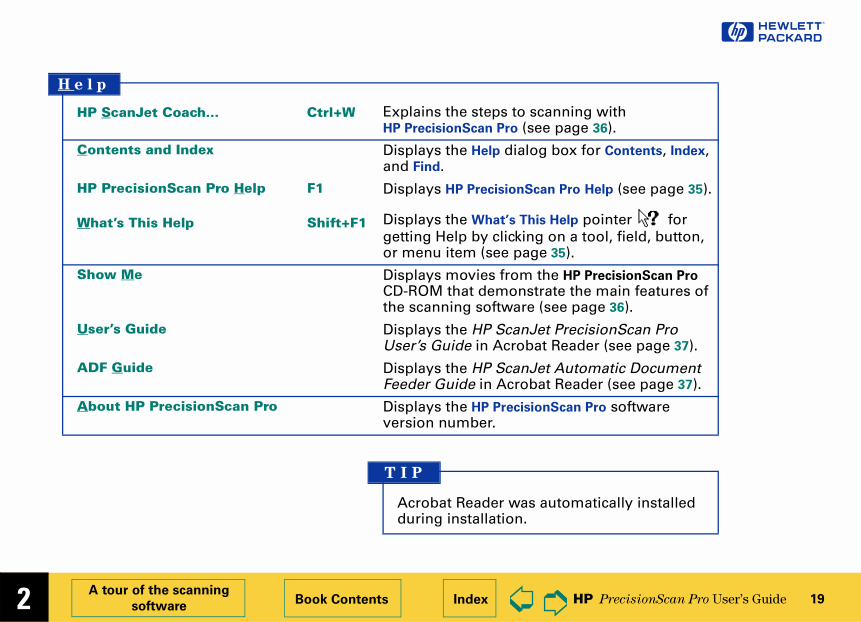
HP ScanJet Coach... Ctrl+W Explains the steps to scanHP PrecisionScan Pro (see p
Contents and Index Displays the Help dialog band Find.
HP PrecisionScan Pro Help F1 Displays HP PrecisionScan
What’s This Help Shift+F1 Displays the What’s This H
getting Help by clicking onor menu item (see page 3
Show Me Displays movies from theCD-ROM that demonstratthe scanning software (se
User’s Guide Displays the HP ScanJet PUser’s Guide in Acrobat R
ADF Guide Displays the HP ScanJet AFeeder Guide in Acrobat R
About HP PrecisionScan Pro Displays the HP PrecisionS
version number.
Acrobat Reader was autduring installation.
T I P
H e l p
�
2 HP PrecisionScan Pro User’s Guide 20
s the preview image
n area (see page 56).
page 100).
oard (see page 99).
age 57).
imensions tool to their
).
ning (see page 36).
r getting Help by m.
A tour of the scanning
softwareBook Contents Index
➮
➮
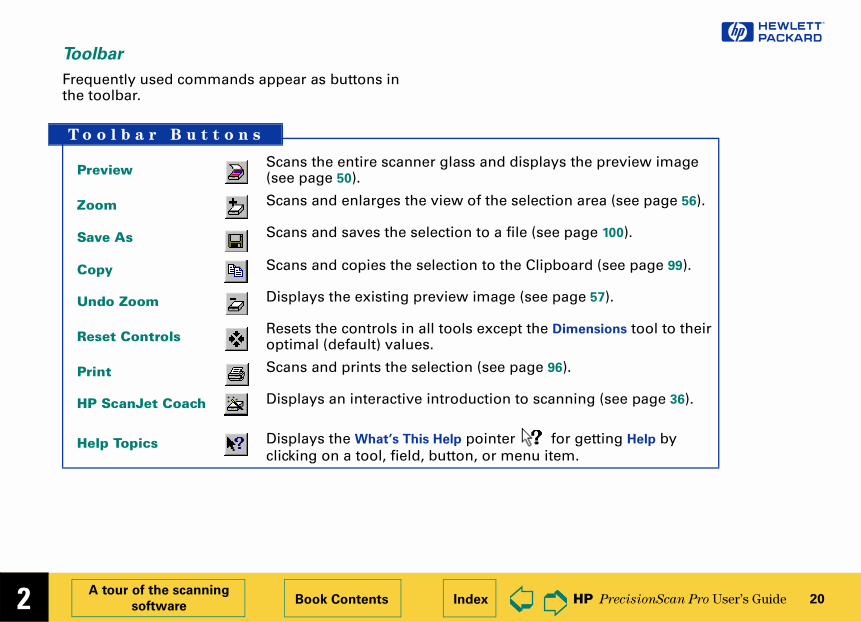
Toolbar
Frequently used commands appear as buttons in the toolbar.
Preview Scans the entire scanner glass and display(see page 50).
Zoom Scans and enlarges the view of the selectio
Save As Scans and saves the selection to a file (see
Copy Scans and copies the selection to the Clipb
Undo Zoom Displays the existing preview image (see p
Reset Controls Resets the controls in all tools except the Doptimal (default) values.
Print Scans and prints the selection (see page 96
HP ScanJet Coach Displays an interactive introduction to scan
Help Topics Displays the What’s This Help pointer foclicking on a tool, field, button, or menu ite
T o o l b a r B u t t o n s
�
2 HP PrecisionScan Pro User’s Guide 21
e preview area
e preview area determines how big plays.
anning software window when you se the magnification of the view of a e.
d image after a Zoom scan
A tour of the scanning
softwareBook Contents Index
➮
➮
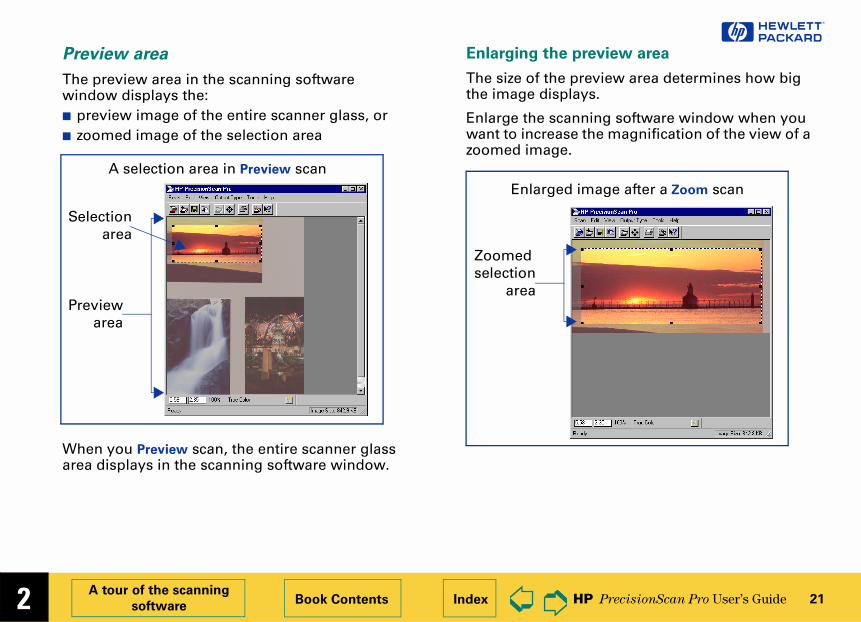
Preview area
The preview area in the scanning software window displays the:■ preview image of the entire scanner glass, or■ zoomed image of the selection area
When you Preview scan, the entire scanner glass area displays in the scanning software window.
Enlarging th
The size of ththe image dis
Enlarge the scwant to increazoomed imag
Previewarea
A selection area in Preview scan
Selectionarea
Zoomedselection
area
Enlarge
�
2 HP PrecisionScan Pro User’s Guide 22
➍
ftware window info bar
➎
A tour of the scanning
softwareBook Contents Index
➮
➮
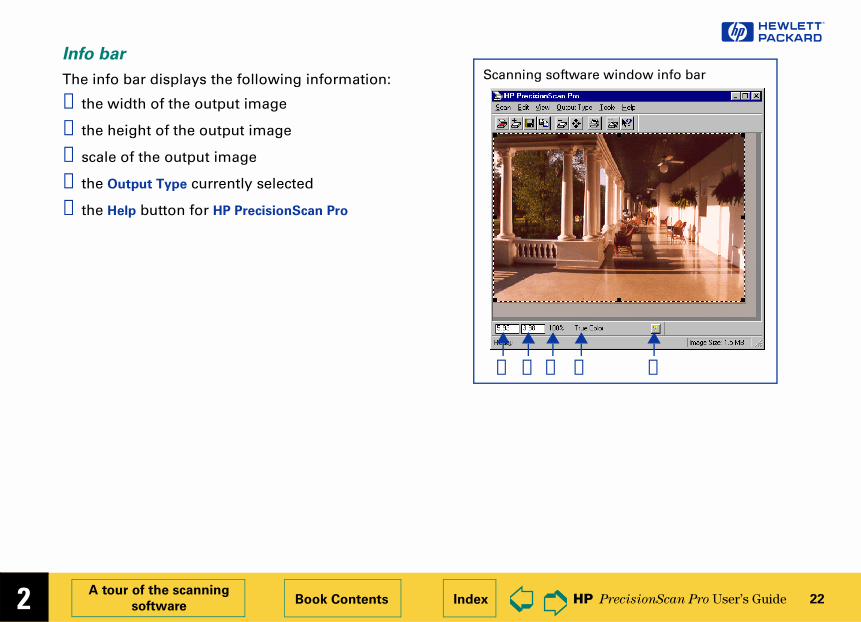
Info bar
The info bar displays the following information:
➊ the width of the output image
➋ the height of the output image
➌ scale of the output image
➍ the Output Type currently selected
➎ the Help button for HP PrecisionScan Pro
➊ ➋
Scanning so
➌
�
2 HP PrecisionScan Pro User’s Guide 23
➋
ftware window status bar
A tour of the scanning
softwareBook Contents Index
➮
➮
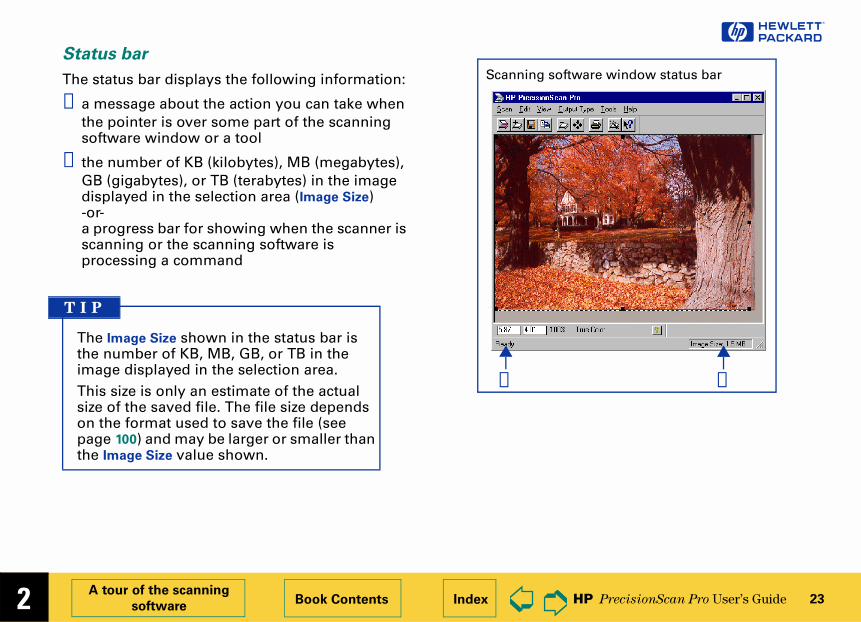
Status bar
The status bar displays the following information:
➊ a message about the action you can take when the pointer is over some part of the scanning software window or a tool
➋ the number of KB (kilobytes), MB (megabytes), GB (gigabytes), or TB (terabytes) in the image displayed in the selection area (Image Size)-or-a progress bar for showing when the scanner is scanning or the scanning software is processing a command
The Image Size shown in the status bar is the number of KB, MB, GB, or TB in the image displayed in the selection area. This size is only an estimate of the actual size of the saved file. The file size depends on the format used to save the file (see page 100) and may be larger or smaller than the Image Size value shown.
T I P
➊
Scanning so
�
2 HP PrecisionScan Pro User’s Guide 24
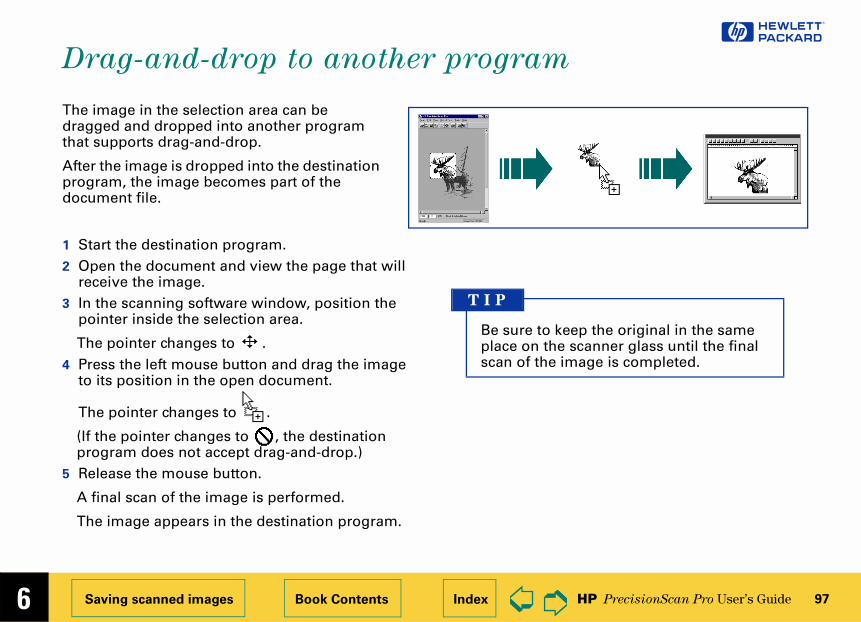
cation in the preview
rogram’s open
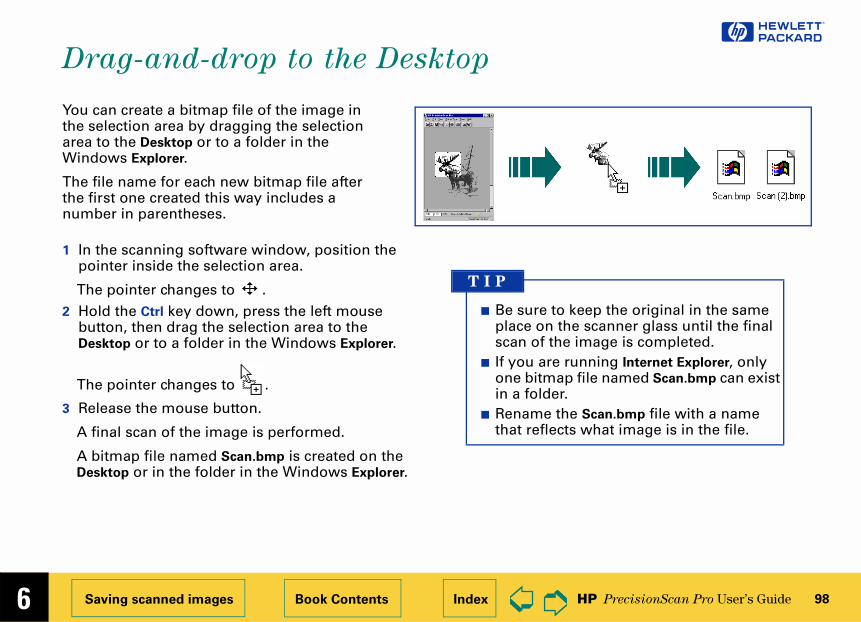
election area to the he Windows Explorer.
de of the selection area a.
top or bottom of the he selection area.
orner of the selection width of the selection
been dragged to
gged to does not
A tour of the scanning
softwareBook Contents Index
➮
➮
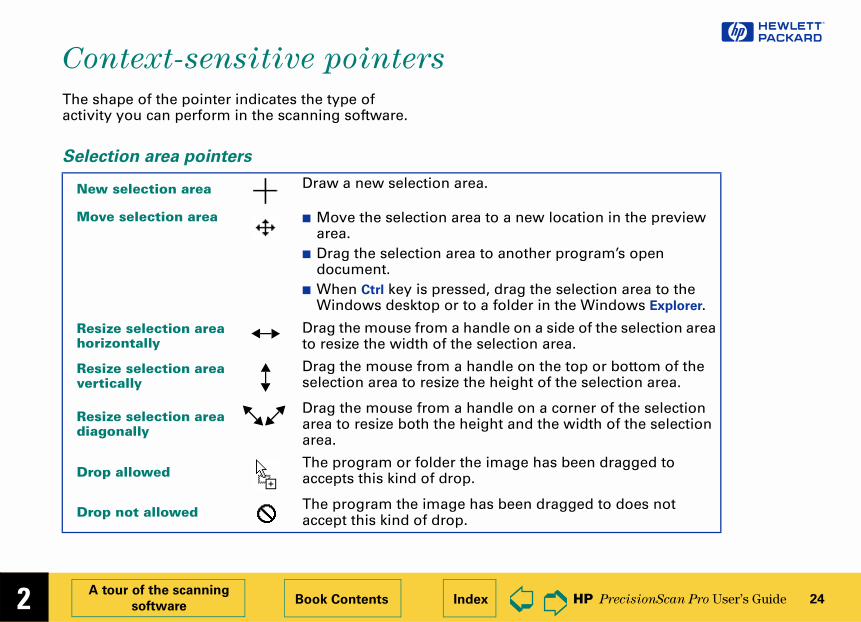
Context-sensitive pointers
The shape of the pointer indicates the type of activity you can perform in the scanning software.
Selection area pointers
New selection area Draw a new selection area.
Move selection area ■ Move the selection area to a new loarea.
■ Drag the selection area to another pdocument.
■ When Ctrl key is pressed, drag the sWindows desktop or to a folder in t
Resize selection area horizontally
Drag the mouse from a handle on a sito resize the width of the selection are
Resize selection area vertically
Drag the mouse from a handle on theselection area to resize the height of t
Resize selection area diagonally
Drag the mouse from a handle on a carea to resize both the height and thearea.
Drop allowedThe program or folder the image has accepts this kind of drop.
Drop not allowed The program the image has been draaccept this kind of drop.
�
2 HP PrecisionScan Pro User’s Guide 25
and.
o increase or decrease
f the image to see the d in the pixel Adjustment tool. Click
f the image to see the d the pixel distribution tool. Click to set the
tem for pop-up Help on
A tour of the scanning
softwareBook Contents Index
➮
➮
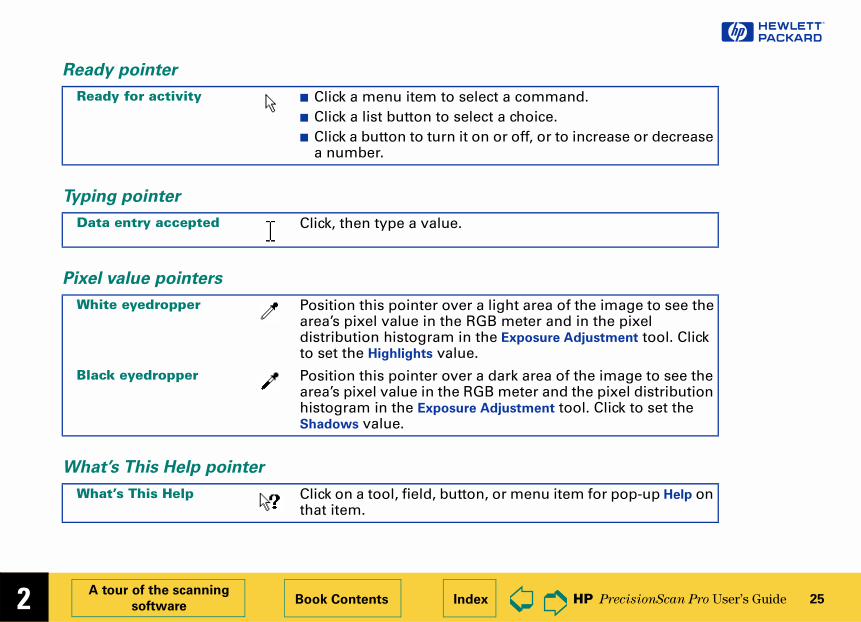
Ready pointer
Ready for activity ■ Click a menu item to select a comm■ Click a list button to select a choice.■ Click a button to turn it on or off, or t
a number.
Typing pointer
Data entry accepted Click, then type a value.
Pixel value pointers
White eyedropper Position this pointer over a light area oarea’s pixel value in the RGB meter andistribution histogram in the Exposure
to set the Highlights value.Black eyedropper Position this pointer over a dark area o
area’s pixel value in the RGB meter anhistogram in the Exposure Adjustment Shadows value.
What’s This Help pointer
What’s This Help Click on a tool, field, button, or menu ithat item.
�
2 HP PrecisionScan Pro User’s Guide 26
ool
be docked to the scanning software
lution toolel tool
se tools are docked when you close software, they will be docked the start the scanning software.
l
somewhere in the margin of a ol, or drag the tool to the toolbar.
tool
somewhere in the margin of the .
ce the tools anywhere on the esktop.he pointer over the tool’s title
drag the tool to a new location.
A tour of the scanning
softwareBook Contents Index
➮
➮
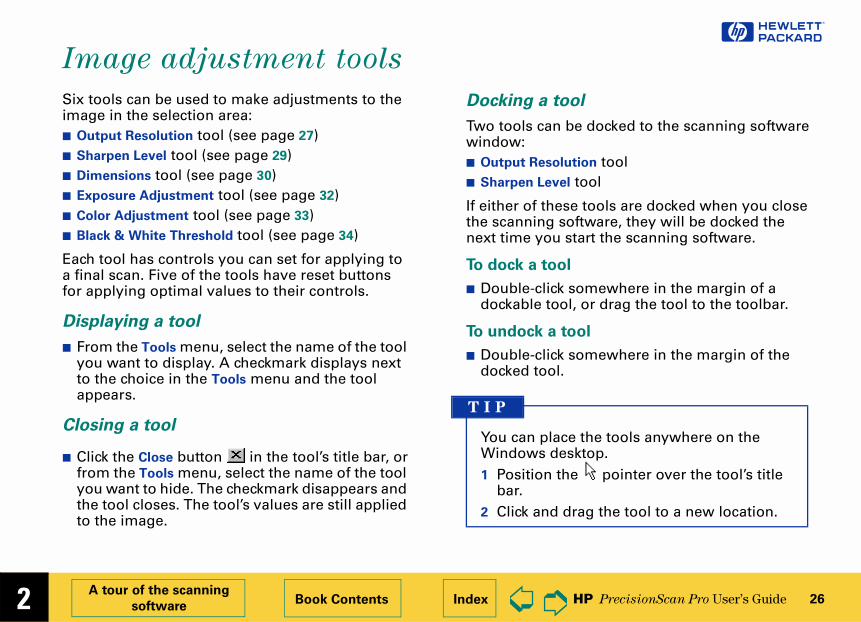
Image adjustment tools
Six tools can be used to make adjustments to the image in the selection area:■ Output Resolution tool (see page 27)■ Sharpen Level tool (see page 29)■ Dimensions tool (see page 30)■ Exposure Adjustment tool (see page 32)■ Color Adjustment tool (see page 33)■ Black & White Threshold tool (see page 34)
Each tool has controls you can set for applying to a final scan. Five of the tools have reset buttons for applying optimal values to their controls.
Displaying a tool
■ From the Tools menu, select the name of the tool you want to display. A checkmark displays next to the choice in the Tools menu and the tool appears.
Closing a tool
■ Click the Close button in the tool’s title bar, orfrom the Tools menu, select the name of the tool you want to hide. The checkmark disappears and the tool closes. The tool’s values are still applied to the image.
Docking a t
Two tools canwindow:■ Output Reso
■ Sharpen Lev
If either of thethe scanning next time you
To dock a too
■ Double-clickdockable to
To undock a
■ Double-clickdocked tool
You can plaWindows d1 Position t
bar.2 Click and
T I P
�
2 HP PrecisionScan Pro User’s Guide 27
olution
ose an output type from the Output
e scanning software automatically timal output resolution to the image. ride the automatic setting by ferent value from the list box in the
tion tool or by typing any value nd 999,999 in the field of the Output
l.
displayed on a monitor
5 as the resolution setting if the viewed on a monitor, such as in Web page.
commonly-used resolution he Output Resolution tool’s list esolution tab of the Scan Pro Preferences dialog box 6).
A tour of the scanning
softwareBook Contents Index
➮
➮
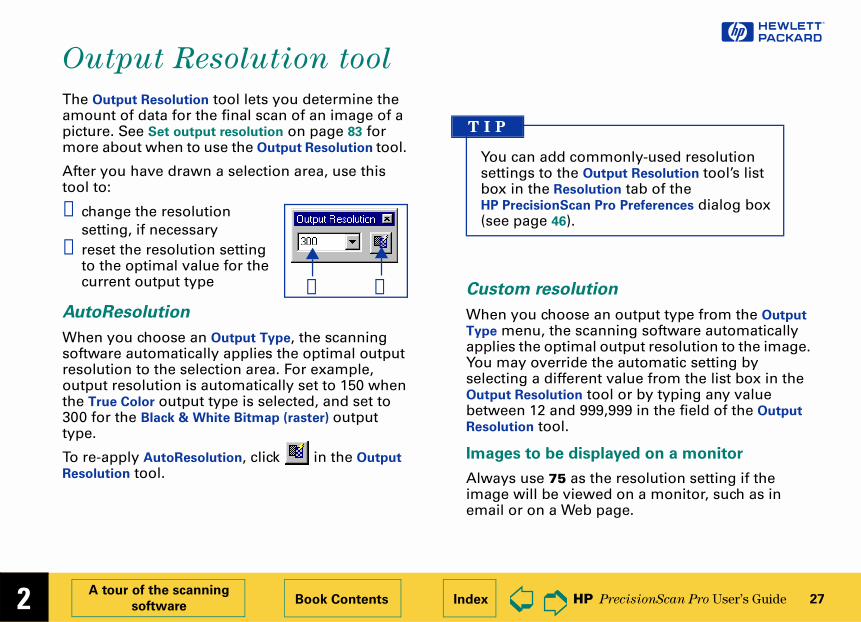
Output Resolution tool
The Output Resolution tool lets you determine the amount of data for the final scan of an image of a picture. See Set output resolution on page 83 for more about when to use the Output Resolution tool.
After you have drawn a selection area, use this tool to:
➊ change the resolution setting, if necessary
➋ reset the resolution setting to the optimal value for the current output type
AutoResolution
When you choose an Output Type, the scanning software automatically applies the optimal output resolution to the selection area. For example, output resolution is automatically set to 150 when the True Color output type is selected, and set to 300 for the Black & White Bitmap (raster) output type.
To re-apply AutoResolution, click in the Output
Resolution tool.
Custom res
When you choType menu, thapplies the opYou may overselecting a difOutput Resolu
between 12 aResolution too
Images to be
Always use 7image will beemail or on a
➊ ➋
You can addsettings to tbox in the RHP Precision
(see page 4
T I P
�
2 HP PrecisionScan Pro User’s Guide 28
change the resolution setting age of a picture, you will not age change in the preview
ype any value between 12 and the Output Resolution tool.nge the resolution setting put Resolution tool and ge the output type, pply AutoResolution w output type by clicking .
A tour of the scanning
softwareBook Contents Index
➮
➮
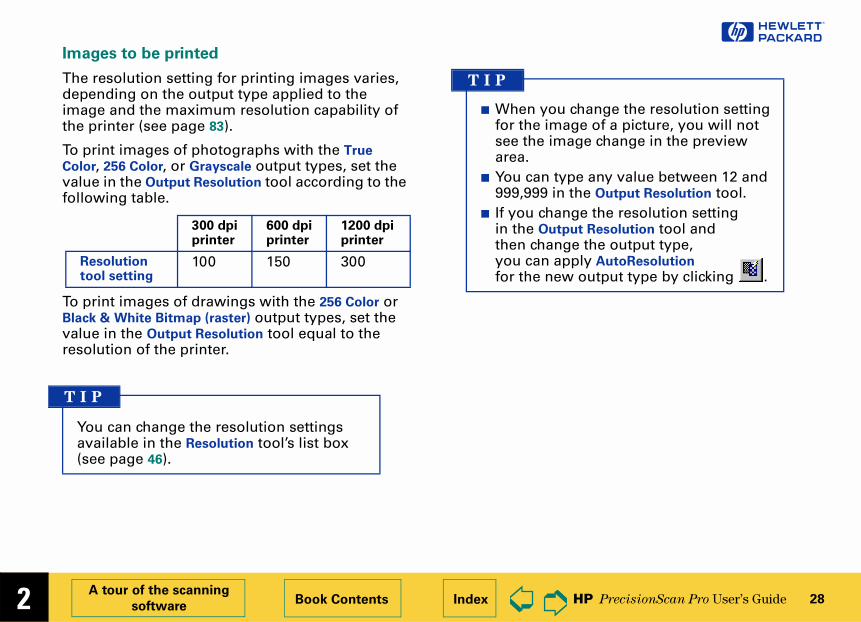
Images to be printed
The resolution setting for printing images varies, depending on the output type applied to the image and the maximum resolution capability of the printer (see page 83).
To print images of photographs with the True
Color, 256 Color, or Grayscale output types, set the value in the Output Resolution tool according to the following table.
To print images of drawings with the 256 Color or Black & White Bitmap (raster) output types, set the value in the Output Resolution tool equal to the resolution of the printer.
300 dpi printer
600 dpi printer
1200 dpi printer
Resolution tool setting
100 150 300
You can change the resolution settings available in the Resolution tool’s list box (see page 46).
T I P
■ When youfor the imsee the imarea.
■ You can t999,999 in
■ If you chain the Out
then chanyou can afor the ne
T I P
�
2 HP PrecisionScan Pro User’s Guide 29
lect a new sharpen level in the el tool, the result of the new el can be seen in the preview
Grayscale output type
en level Extreme sharpen level
A tour of the scanning
softwareBook Contents Index
➮
➮
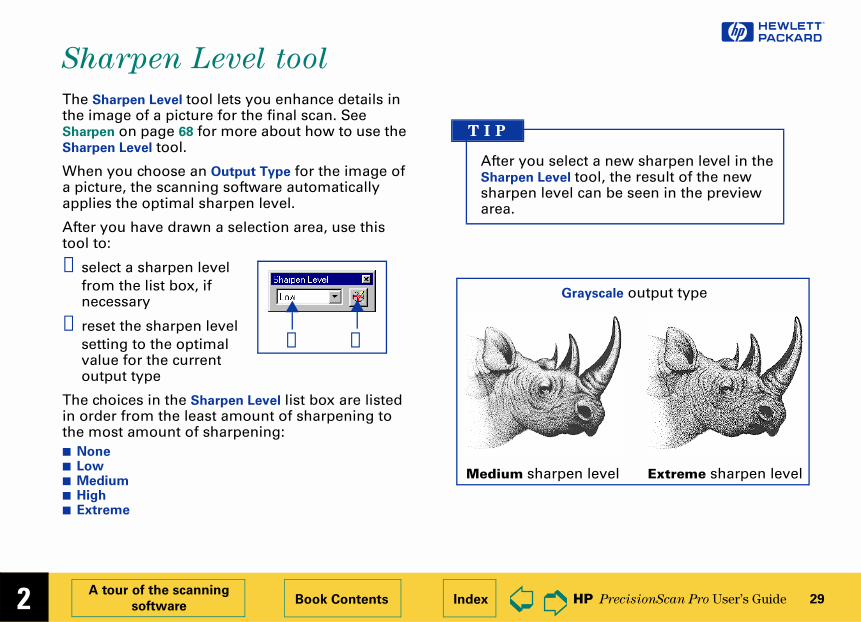
Sharpen Level tool
The Sharpen Level tool lets you enhance details in the image of a picture for the final scan. See Sharpen on page 68 for more about how to use the Sharpen Level tool.
When you choose an Output Type for the image of a picture, the scanning software automatically applies the optimal sharpen level.
After you have drawn a selection area, use this tool to:
➊ select a sharpen level from the list box, if necessary
➋ reset the sharpen level setting to the optimal value for the current output type
The choices in the Sharpen Level list box are listed in order from the least amount of sharpening to the most amount of sharpening:■ None■ Low■ Medium■ High■ Extreme
➊ ➋
After you seSharpen Lev
sharpen levarea.
T I P
Medium sharp
�
2 HP PrecisionScan Pro User’s Guide 30
ons tool, you can:ensions of the selection areas for the selection area and the nsionsage to a percentage of the size of the
ut dimensions of the image for the
50% Scaled image
ale
A tour of the scanning
softwareBook Contents Index
➮
➮
Dimensions tool
The Dimensions tool lets you change the size of the scanned image of a picture so that the image will be the size you want it when you use the image in another program or print it. For example, you can save a small scanned image from a larger original picture.
In the Dimensi
■ set the dim■ set the unit
output dime■ scale the im
original■ set the outp
final scan
Original picture
Sc
�
2 HP PrecisionScan Pro User’s Guide 31
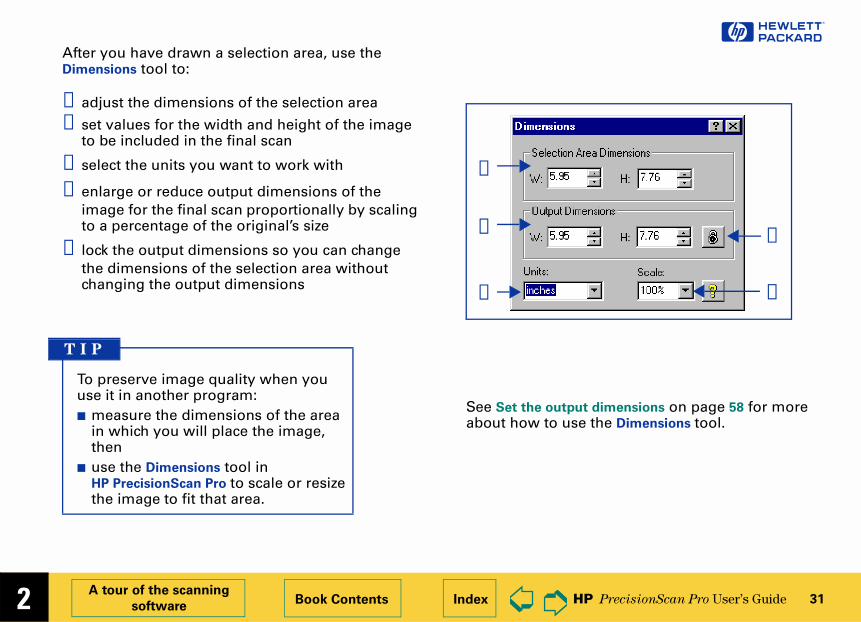
tput dimensions on page 58 for more use the Dimensions tool.
➎
➍
A tour of the scanning
softwareBook Contents Index
➮
➮
After you have drawn a selection area, use the Dimensions tool to:
See Set the ou
about how to
➊ adjust the dimensions of the selection area
➋ set values for the width and height of the image to be included in the final scan
➌ select the units you want to work with
➍ enlarge or reduce output dimensions of the image for the final scan proportionally by scaling to a percentage of the original’s size
➎ lock the output dimensions so you can change the dimensions of the selection area without changing the output dimensions
➊
➋
➌
To preserve image quality when you use it in another program:■ measure the dimensions of the area
in which you will place the image, then
■ use the Dimensions tool in HP PrecisionScan Pro to scale or resize the image to fit that area.
T I P
�
2 HP PrecisionScan Pro User’s Guide 32
ange exposure settings in the justment tool, the results of the be seen in the preview area.
➑
➐➏
A tour of the scanning
softwareBook Contents Index
➮
➮
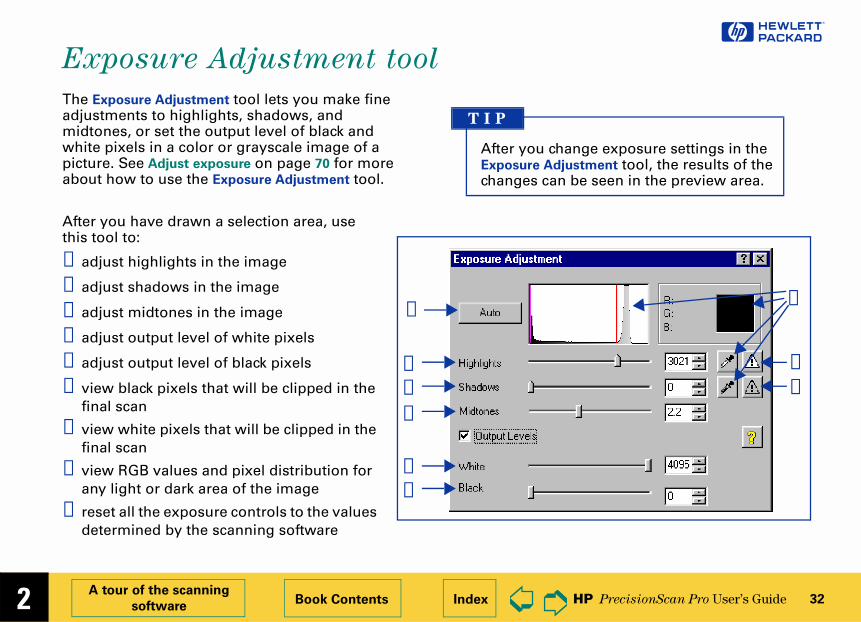
Exposure Adjustment tool
The Exposure Adjustment tool lets you make fine adjustments to highlights, shadows, and midtones, or set the output level of black and white pixels in a color or grayscale image of a picture. See Adjust exposure on page 70 for more about how to use the Exposure Adjustment tool.
After you chExposure Ad
changes can
T I P
After you have drawn a selection area, use this tool to:
➊ adjust highlights in the image
➋ adjust shadows in the image
➌ adjust midtones in the image
➍ adjust output level of white pixels
➎ adjust output level of black pixels
➏ view black pixels that will be clipped in the final scan
➐ view white pixels that will be clipped in the final scan
➑ view RGB values and pixel distribution for any light or dark area of the image
➒ reset all the exposure controls to the values determined by the scanning software
➊➋
➌
➍➎
➒
�
2 HP PrecisionScan Pro User’s Guide 33
e drawn a selection area, use this
hue by dragging the indicator circle Wheel with the mouse
hue by clicking a color’s triangle on heel to move the indicator circle
turation between 0 and 150; the saturation value, the brighter the
hue by typing X and Y values for the l.
lor controls to the values by the scanning software
ange settings in the Color
tool, the results of the new be seen in the preview area.
A tour of the scanning
softwareBook Contents Index
➮
➮
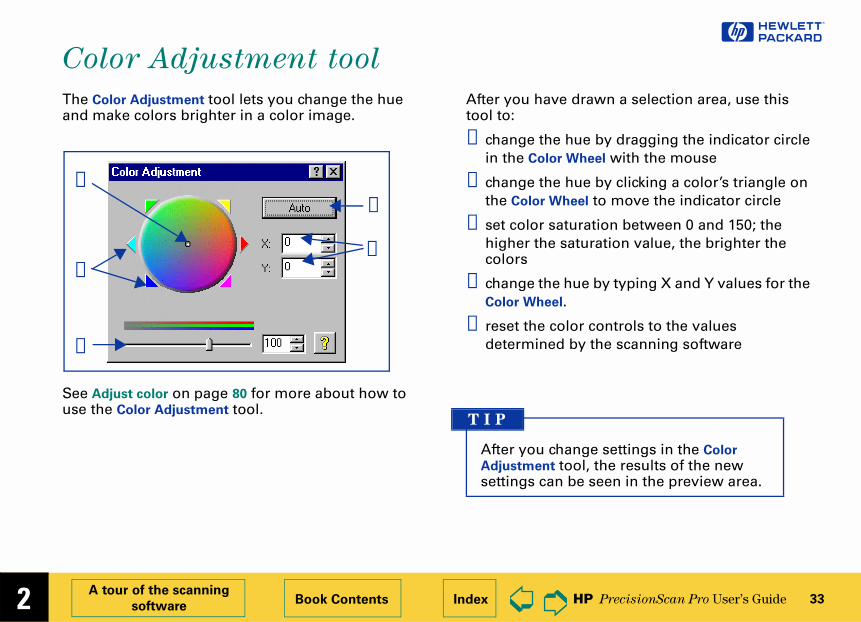
Color Adjustment tool
The Color Adjustment tool lets you change the hue and make colors brighter in a color image.
See Adjust color on page 80 for more about how to use the Color Adjustment tool.
After you havtool to:
➊ change thein the Color
➋ change thethe Color W
➌ set color sahigher the colors
➍ change theColor Whee
➎ reset the codetermined
➊
➌
➎
➋➍
After you chAdjustment
settings can
T I P
�
2 HP PrecisionScan Pro User’s Guide 34
ange settings in the Black &
hold tool, the results of the new be seen in the preview area.
e Bitmap (raster) output type
A tour of the scanning
softwareBook Contents Index
➮
➮
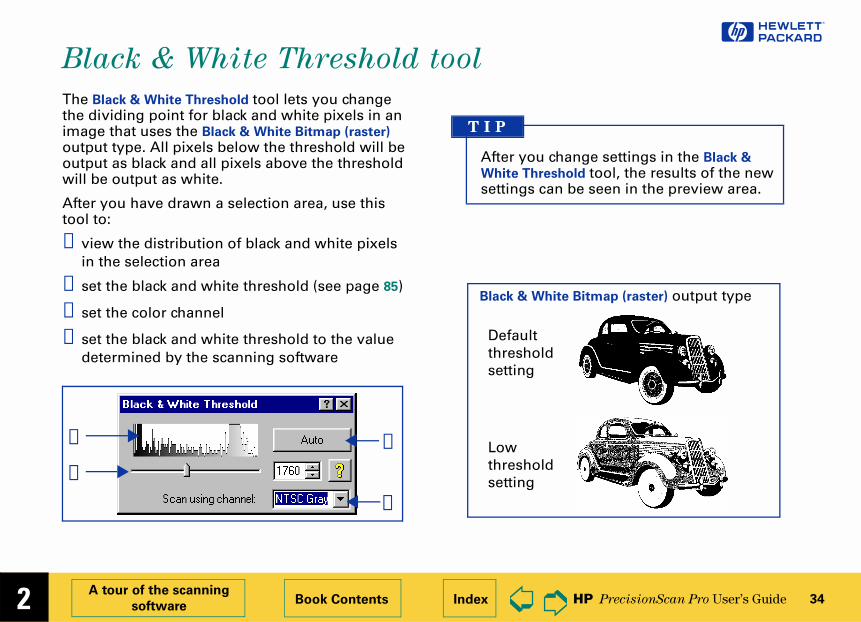
Black & White Threshold tool
The Black & White Threshold tool lets you change the dividing point for black and white pixels in an image that uses the Black & White Bitmap (raster)
output type. All pixels below the threshold will be output as black and all pixels above the threshold will be output as white.
After you have drawn a selection area, use this tool to:
➊ view the distribution of black and white pixels in the selection area
➋ set the black and white threshold (see page 85)
➌ set the color channel
➍ set the black and white threshold to the value determined by the scanning software
➋
➍➊
➌
After you chWhite Thres
settings can
T I P
Black & Whit
Defaultthresholdsetting
Lowthresholdsetting
�
2 HP PrecisionScan Pro User’s Guide 35
’s This Help for a tool
he title bar of a tool to change the .
in a tool.lp description appears.
nScan Pro Help
onScan Pro Help to learn about using software and the scanner.
from the Desktop
, the Windows Start button.art menu, choose Programs, then canJet Software:HP Online
nJet Help.
isionScan Pro Help window appears.
from the scanning software
anning software Help menu, select Scan Pro Help or Contents and Index,
in the info bar.
isionScan Pro Help window appears.
A tour of the scanning
softwareBook Contents Index
➮
➮
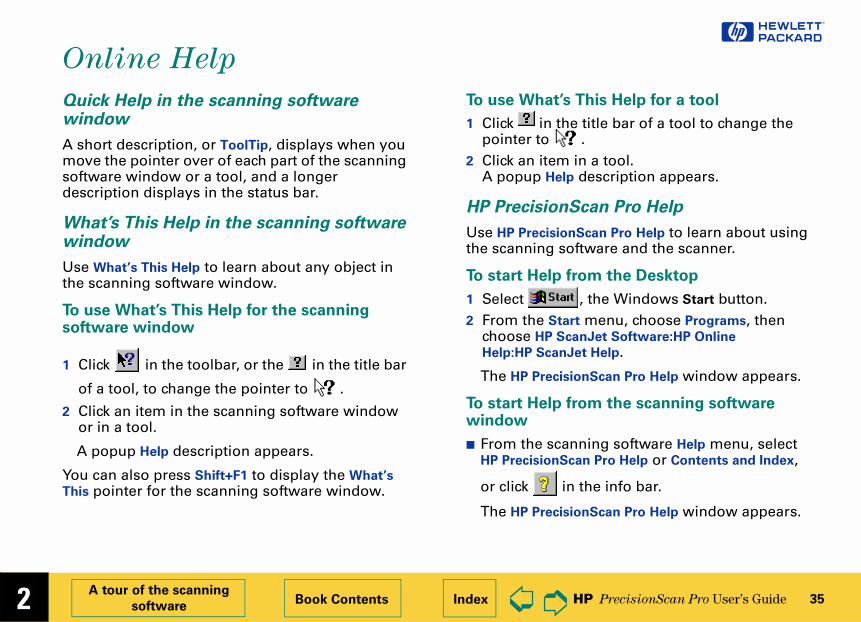
Online Help
Quick Help in the scanning software window
A short description, or ToolTip, displays when you move the pointer over of each part of the scanning software window or a tool, and a longer description displays in the status bar.
What’s This Help in the scanning software window
Use What’s This Help to learn about any object in the scanning software window.
To use What’s This Help for the scanning software window
1 Click in the toolbar, or the in the title bar
of a tool, to change the pointer to .
2 Click an item in the scanning software window or in a tool.
A popup Help description appears.
You can also press Shift+F1 to display the What’s
This pointer for the scanning software window.
To use What
1 Click in tpointer to
2 Click an itemA popup He
HP Precisio
Use HP Precisi
the scanning
To start Help
1 Select 2 From the St
choose HP S
Help:HP Sca
The HP Prec
To start Helpwindow
■ From the scHP Precision
or click
The HP Prec
�
2 HP PrecisionScan Pro User’s Guide 36
s of basic scanning concepts can be the HP PrecisionScan Pro CD.
P PrecisionScan Pro CD into the ive. computer speakers.
eo from the Desktop
, the Windows Start button.art menu, choose Programs, then canJet Software:HP Online Help:Show
eo from the Help menu
anning software.elp menu, choose Show Me.
eo from online Help
active at the top of a Help
.
A tour of the scanning
softwareBook Contents Index
➮
➮
HP ScanJet Coach
Use the HP ScanJet Coach to learn the steps for scanning.
To start the HP ScanJet Coach from the Desktop
1 Select , the Windows Start button.2 From the Start menu, choose Programs, then
choose HP ScanJet Software:HP Online
Help:HP ScanJet Coach.
The HP PrecisionScan Pro Help window appears.
The HP ScanJet Coach appears.
To start the HP ScanJet Coach from the scanning software
■ Click in the scanning software toolbar, or from the scanning software Help menu, select HP ScanJet Coach.
The HP ScanJet Coach appears.
Videos
Several videoaccessed from1 Insert the H
CD-ROM dr2 Turn on the
To start a vid
1 Select 2 From the St
choose HP S
Me Videos.
To start a vid
1 Start the sc2 From the H
To start a vid
When you seetopic,
■ Click
�
2 HP PrecisionScan Pro User’s Guide 37
A tour of the scanning
softwareBook Contents Index
➮
➮
Online manuals
In addition to this HP PrecisionScan Pro User’s Guide online manual, you can view the HP ScanJet Automatic Document Feeder Guide in Adobe Acrobat Reader, which describes how to use the HP ScanJet Automatic Document Feeder.
To view an online manual from the Desktop
1 Select , the Windows Start button.2 From the Start menu, choose Programs, then
choose HP PrecisionScan Pro:HP Online Help and the manual.
Adobe Acrobat Reader starts and displays the online manual.
To view an online manual from the scanning software
■ From the scanning software Help menu, select the manual.
Adobe Acrobat Reader starts and displays the online manual.
�
2 HP PrecisionScan Pro User’s Guide 38
gs
s dialog boxttings tab
A tour of the scanning
softwareBook Contents Index
➮
➮
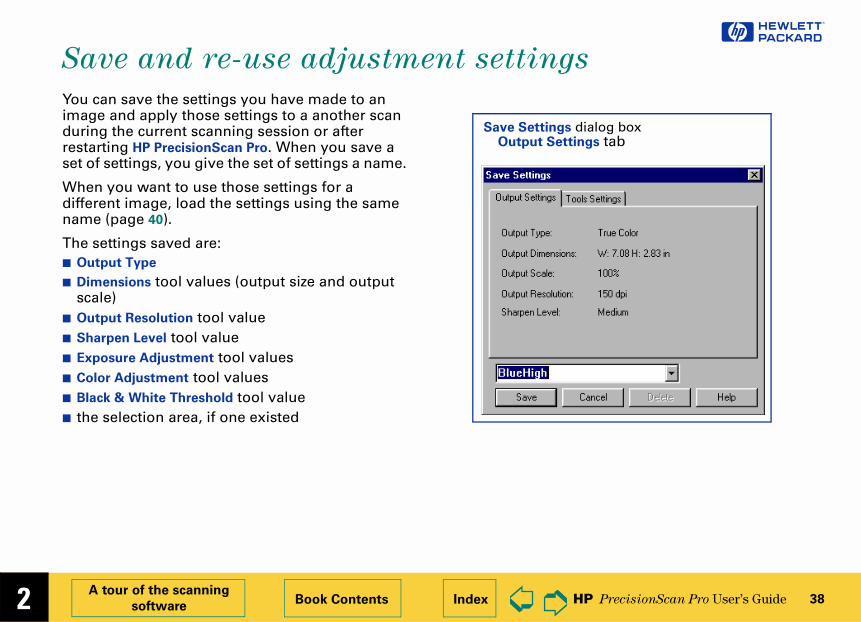
Save and re-use adjustment settin
You can save the settings you have made to an image and apply those settings to a another scan during the current scanning session or after restarting HP PrecisionScan Pro. When you save a set of settings, you give the set of settings a name.
When you want to use those settings for a different image, load the settings using the same name (page 40).
The settings saved are:■ Output Type
■ Dimensions tool values (output size and output scale)
■ Output Resolution tool value■ Sharpen Level tool value■ Exposure Adjustment tool values■ Color Adjustment tool values■ Black & White Threshold tool value■ the selection area, if one existed
Save SettingOutput Se
�
2 HP PrecisionScan Pro User’s Guide 39
t of settings
an menu, select Save Settings...
ttings dialog box appears (see
settings listed in the Output Settings ls Settings tabs.gs are acceptable for saving, click in d of the Save Settings dialog box, name for the settings.
Settings dialog box closes.d set of settings is saved for future age 40).
A tour of the scanning
softwareBook Contents Index
➮
➮
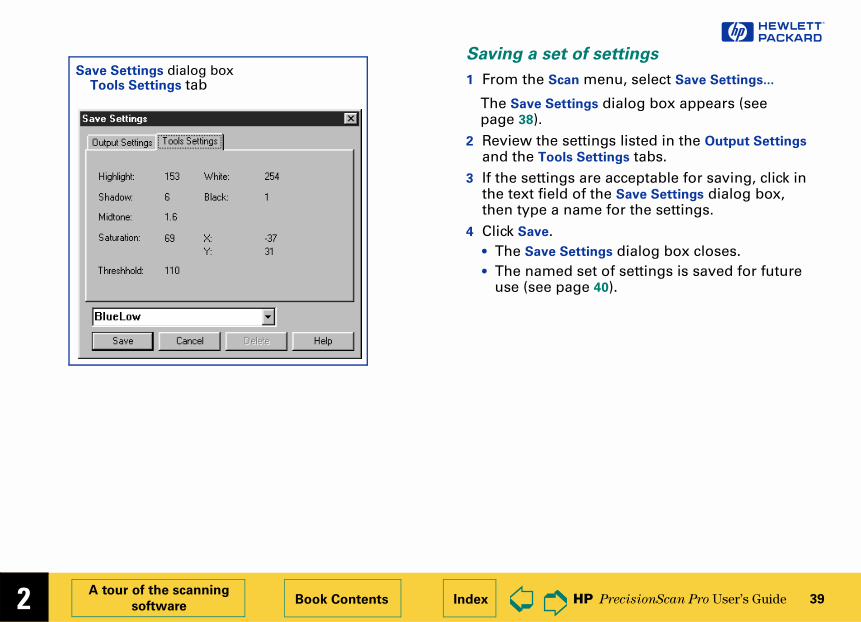
Saving a se
1 From the Sc
The Save Se
page 38).2 Review the
and the Too
3 If the settinthe text fielthen type a
4 Click Save.• The Save
• The nameuse (see p
Save Settings dialog boxTools Settings tab
�
2 HP PrecisionScan Pro User’s Guide 40
an menu, select Load Settings...
ttings dialog box appears.t box, select the name of the set of want to load.
settings listed in the Output Settings ls Settings tabs.gs are acceptable for loading, click
Settings dialog box closes.gs are applied to the image.
et of settings
an menu, select Save Settings...
ttings dialog box appears.t box, select the name of the set of want to delete.
.
ting dialog box appears.
ettings is deleted from the list of gs.
A tour of the scanning
softwareBook Contents Index
➮
➮
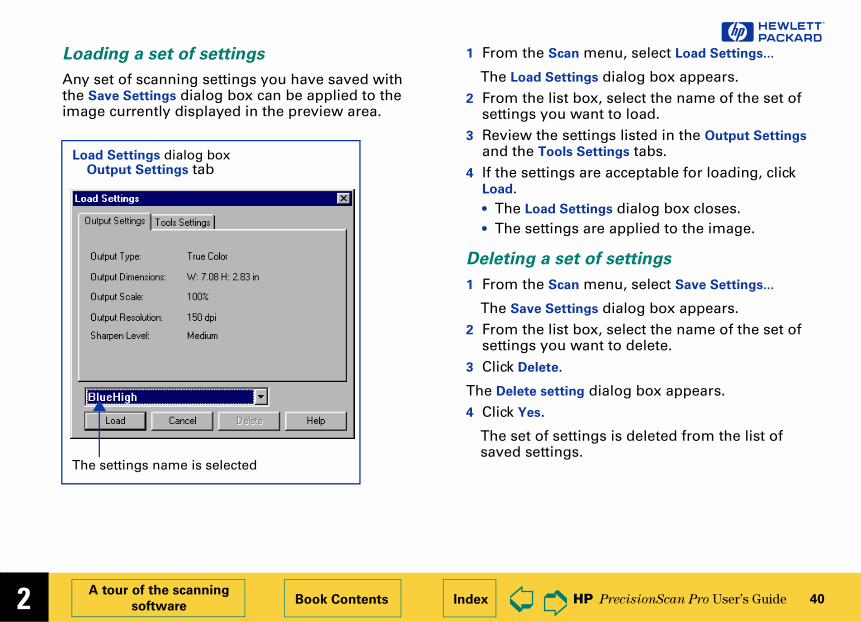
Loading a set of settings
Any set of scanning settings you have saved with the Save Settings dialog box can be applied to the image currently displayed in the preview area.
1 From the Sc
The Load Se
2 From the lissettings you
3 Review theand the Too
4 If the settinLoad.• The Load
• The settin
Deleting a s
1 From the Sc
The Save Se
2 From the lissettings you
3 Click Delete
The Delete set
4 Click Yes.
The set of ssaved settin
Load Settings dialog boxOutput Settings tab
The settings name is selected
�
2 HP PrecisionScan Pro User’s Guide 41
e HP PrecisionScan Pro dialog box
an menu, select Preferences...
isionScan Pro Preferences dialog box
➌ ➍
A tour of the scanning
softwareBook Contents Index
➮
➮
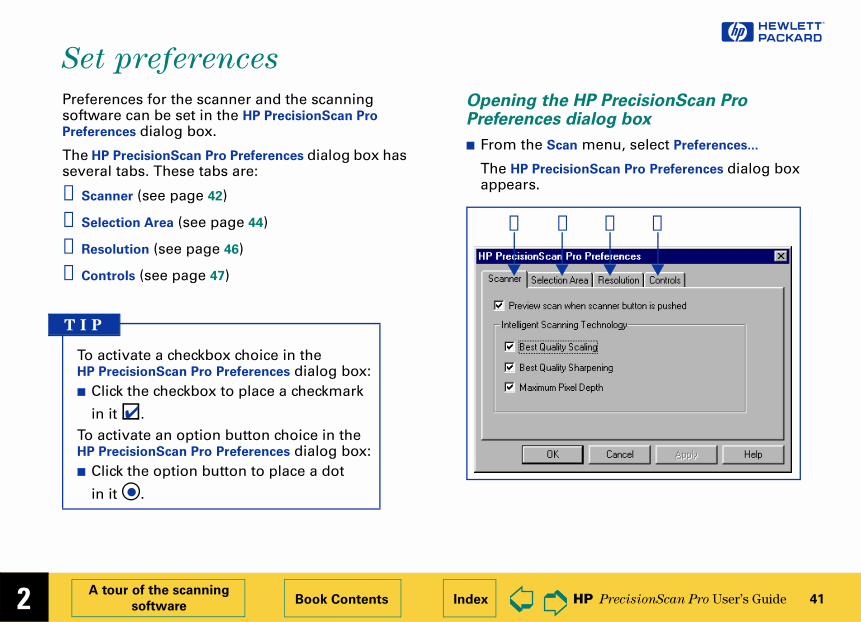
Set preferences
Preferences for the scanner and the scanning software can be set in the HP PrecisionScan Pro
Preferences dialog box.
The HP PrecisionScan Pro Preferences dialog box has several tabs. These tabs are:
➊ Scanner (see page 42)
➋ Selection Area (see page 44)
➌ Resolution (see page 46)
➍ Controls (see page 47)
Opening thPreferences
■ From the Sc
The HP Prec
appears.
To activate a checkbox choice in the HP PrecisionScan Pro Preferences dialog box: ■ Click the checkbox to place a checkmark
in it .To activate an option button choice in the HP PrecisionScan Pro Preferences dialog box: ■ Click the option button to place a dot
in it .
✔
●
T I P
➊ ➋
�
2 HP PrecisionScan Pro User’s Guide 42
choices in this tab are turned on
A tour of the scanning
softwareBook Contents Index
➮
➮
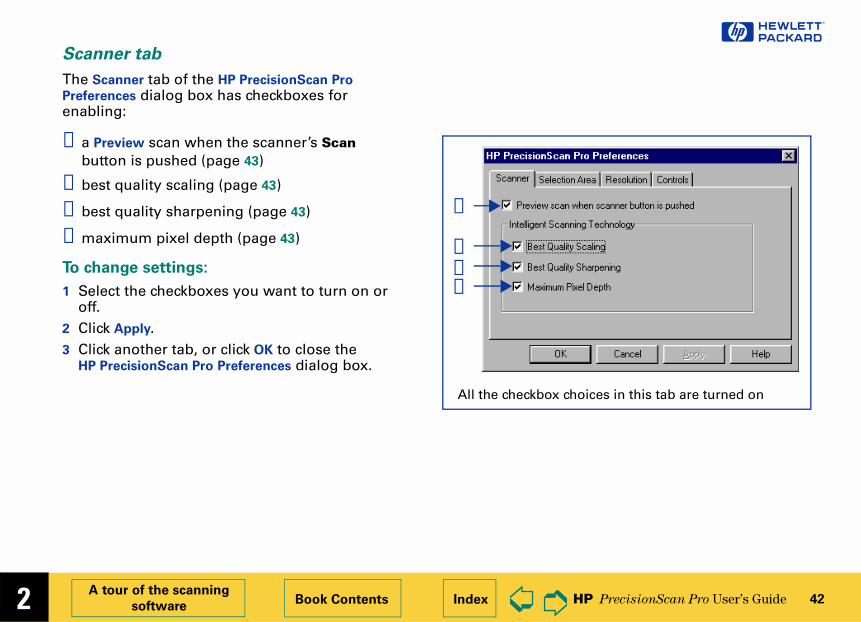
Scanner tab
The Scanner tab of the HP PrecisionScan Pro Preferences dialog box has checkboxes for enabling:
➊ a Preview scan when the scanner’s Scan button is pushed (page 43)
➋best quality scaling (page 43)
➌best quality sharpening (page 43)
➍maximum pixel depth (page 43)
To change settings:
1 Select the checkboxes you want to turn on or off.
2 Click Apply.3 Click another tab, or click OK to close the
HP PrecisionScan Pro Preferences dialog box.
➊
➋➌➍
All the checkbox
�
2 HP PrecisionScan Pro User’s Guide 43
ixel Depth
ckbox is checked, the largest pixel plied to the scan to produce the
y image.
ckbox is not checked, scanning is t output types because there is less ing processed. If your scanner is
a parallel port, you may see a provement in performance without a tion in image quality when you eckmark from this feature.
when HP PrecisionScan Pro is l the checkboxes are checked in tab of the HP PrecisionScan Pro dialog box.
A tour of the scanning
softwareBook Contents Index
➮
➮
Preview scan when scanner button is pushed
When this checkbox is checked, each time you push the Scan button on the scanner the scanner automatically performs a Preview scan. This means you can start a Preview scan with the Scan button.
When this checkbox is not checked, pushing the Scan button on the scanner does not start a Preview scan. You will need to start a Preview scan by: ■ clicking in the toolbar
-or-■ choosing Preview from the Scan menu
Best Quality Scaling
When this checkbox is checked, the highest quality scaling is applied to the final scan.
When this checkbox is not checked, scanning is faster because normal quality scaling is applied to the final scan.
Best Quality Sharpening
When this checkbox is checked, the highest quality of sharpening is applied to the final scan.
When this checkbox is not checked, scanning is faster because normal quality sharpening is applied to the final scan.
Maximum P
When this chebit depth is aphighest qualit
When this chefaster for mosimage data beconnected to significant imlarge degradaremove the ch
By default, installed, althe Scanner
Preferences
T I P
�
2 HP PrecisionScan Pro User’s Guide 44
n HP PrecisionScan Pro is installed, es are checked in the Selection Area
ecisionScan Pro Preferences dialog
A tour of the scanning
softwareBook Contents Index
➮
➮
Selection Area tab
The Selection Area tab of the HP PrecisionScan Pro Preferences dialog box has checkboxes for controlling whether the scanning software should automatically:
➊ create a selection area when the mouse is clicked (page 45)
➋determine the best Output Type for the selection area (page 45)
➌determine the optimal exposure level for the selection area (page 45)
➍determine the optimal color balance and saturation for the selection area (page 45)
To change settings:
1 Select the checkboxes you want to turn on or off.
2 Click Apply.
3 Click another tab, or click OK to close the HP PrecisionScan Pro Preferences dialog box.
➊➋➌➍
By default, wheall the checkboxtab of the HP Pr
box.
T I P
�
2 HP PrecisionScan Pro User’s Guide 45
ckbox is not checked, the scanning not change the current output type election area is created. You will ally select the appropriate output Output Type menu when you create n area.
ly adjust exposure after selection
ckbox is checked, each time you selection area by clicking (see scanning software automatically ontrols in the Exposure Adjustment timal values.
ckbox is not checked, the scanning not automatically reset the controls djustment tool when you create a area.
ly adjust color after selection
ckbox is checked, each time you selection area by clicking (see scanning software automatically ontrols in the Color Adjustment tool to lues.
ckbox is not checked, the scanning not automatically reset the controls justment tool when you create a new .
A tour of the scanning
softwareBook Contents Index
➮
➮
Automatically create selection area after a mouse click
When this checkbox is checked, the scanning software automatically creates a selection area when you click over a part of the image while the pointer looks like this: .
When this checkbox is not checked:■ the scanning software does not automatically
create a selection area when you click over a part of the image
■ you will need to draw the selection area (see page 53)
Automatically set the output type after selection
When this checkbox is checked, the scanning software automatically changes the output type for a new selection area created by clicking (see page 52). The scanning software determines which output type to apply based on the contents of the selection area:■ True Color is applied when the selection area
contains enough color■ Grayscale is applied when the selection area
contains mostly grayscale information■ Black and White Bitmap (raster) is applied if the
selection area contains mostly black and white information
When this chesoftware doeswhen a new sneed to manutype from thea new selectio
Automatical
When this checreate a new page 52), the changes the ctool to the op
When this chesoftware doesthe Exposure A
new selection
Automatical
When this checreate a new page 52), the changes the cthe optimal va
When this chesoftware doesin the Color Ad
selection area
�
2 HP PrecisionScan Pro User’s Guide 46
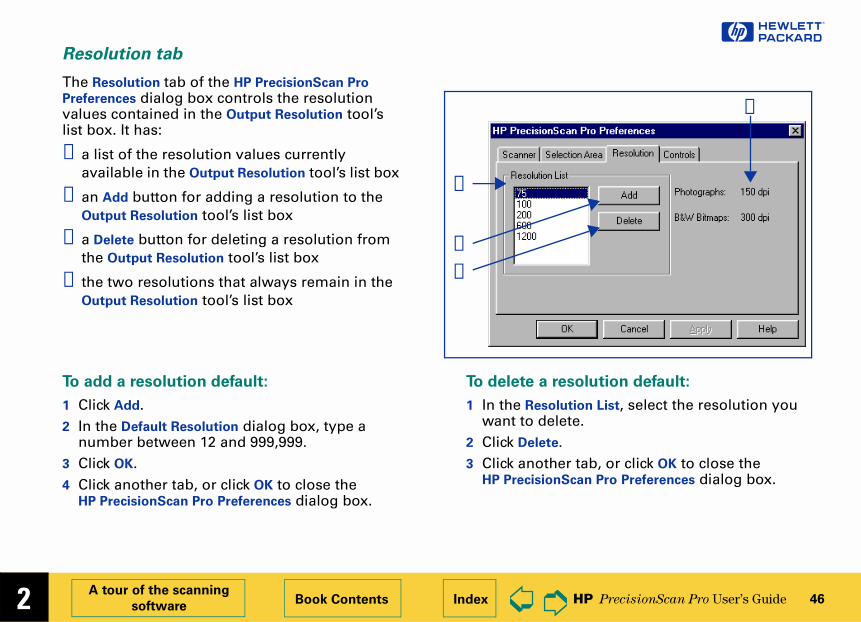
esolution default:
ution List, select the resolution you ete..er tab, or click OK to close the Scan Pro Preferences dialog box.
➍
A tour of the scanning
softwareBook Contents Index
➮
➮
Resolution tab
To add a resolution default:
1 Click Add. 2 In the Default Resolution dialog box, type a
number between 12 and 999,999.3 Click OK.4 Click another tab, or click OK to close the
HP PrecisionScan Pro Preferences dialog box.
To delete a r
1 In the Resol
want to del2 Click Delete
3 Click anothHP Precision
The Resolution tab of the HP PrecisionScan Pro Preferences dialog box controls the resolution values contained in the Output Resolution tool’s list box. It has:
➊ a list of the resolution values currently available in the Output Resolution tool’s list box
➋ an Add button for adding a resolution to the Output Resolution tool’s list box
➌ a Delete button for deleting a resolution from the Output Resolution tool’s list box
➍ the two resolutions that always remain in the Output Resolution tool’s list box
➊
➌
➋
�
2 HP PrecisionScan Pro User’s Guide 47
nge sets the amount of tonal color available for correction in the
stment and Black & White Threshold
larger number of bits for the control in greater control of compensation or threshold correction.
A tour of the scanning
softwareBook Contents Index
➮
➮
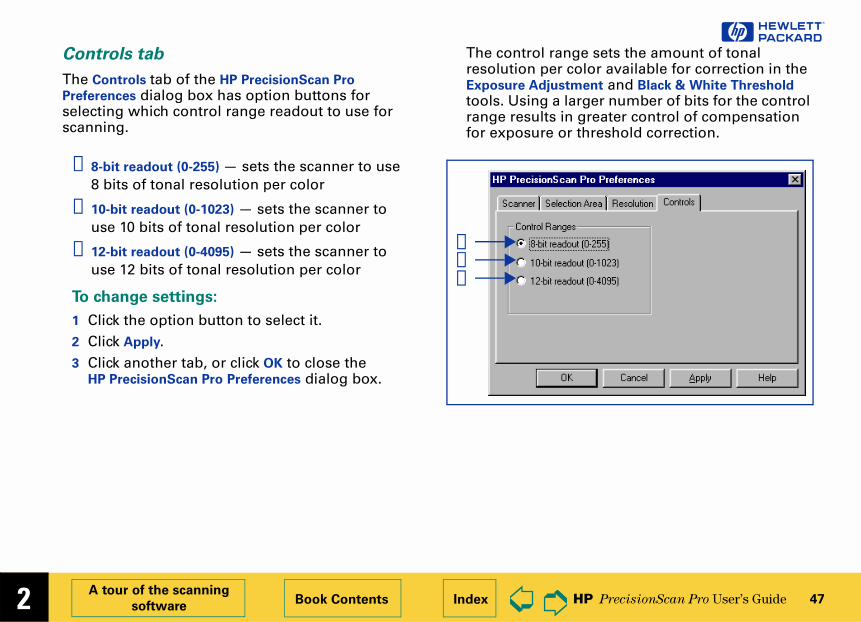
Controls tab
The Controls tab of the HP PrecisionScan Pro Preferences dialog box has option buttons for selecting which control range readout to use for scanning.
The control raresolution perExposure Adju
tools. Using arange results for exposure
➊ 8-bit readout (0-255) — sets the scanner to use 8 bits of tonal resolution per color
➋ 10-bit readout (0-1023) — sets the scanner to use 10 bits of tonal resolution per color
➌ 12-bit readout (0-4095) — sets the scanner to use 12 bits of tonal resolution per color
To change settings:
1 Click the option button to select it.2 Click Apply.3 Click another tab, or click OK to close the
HP PrecisionScan Pro Preferences dialog box.
➊➋➌
�
pictures 3
canning pictures
n area
view image (Undo Zoom)
imensions
t type
3➮
➮
Scanning
49 Basic steps for s
50 Preview scan
51 Create a selectio
56 Zoom scan
57 Return to the pre
58 Set the output d
62 Choose an outpu
�
3 HP PrecisionScan Pro User’s Guide 49
mage with or a 256
ype:ge 68)sure
r (page 80)
mage with output
ge 68)sure
mage with e output type:ge 68) and white age 85) or el (page 87)
Scanning pictures Book Contents Index
➮
➮
Basic steps for scanning pictures
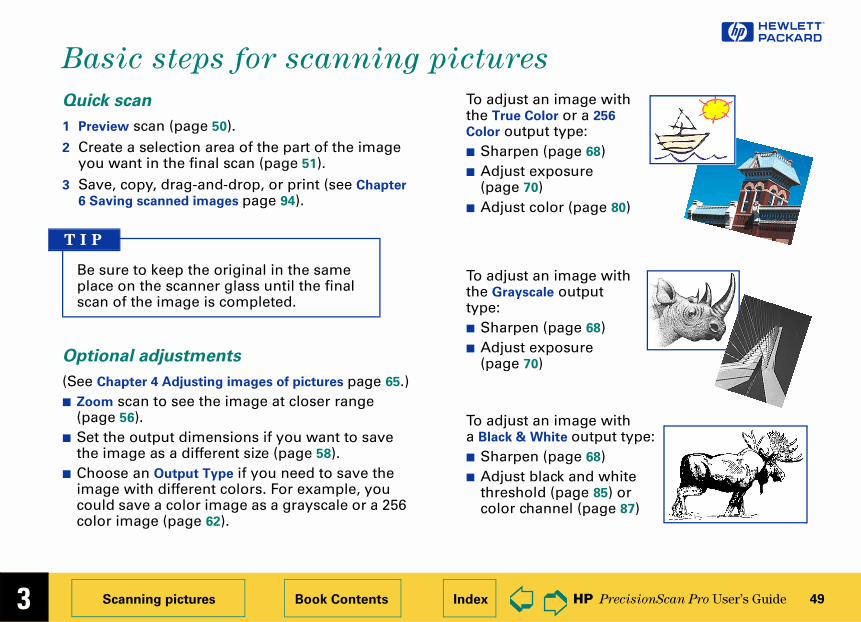
Quick scan
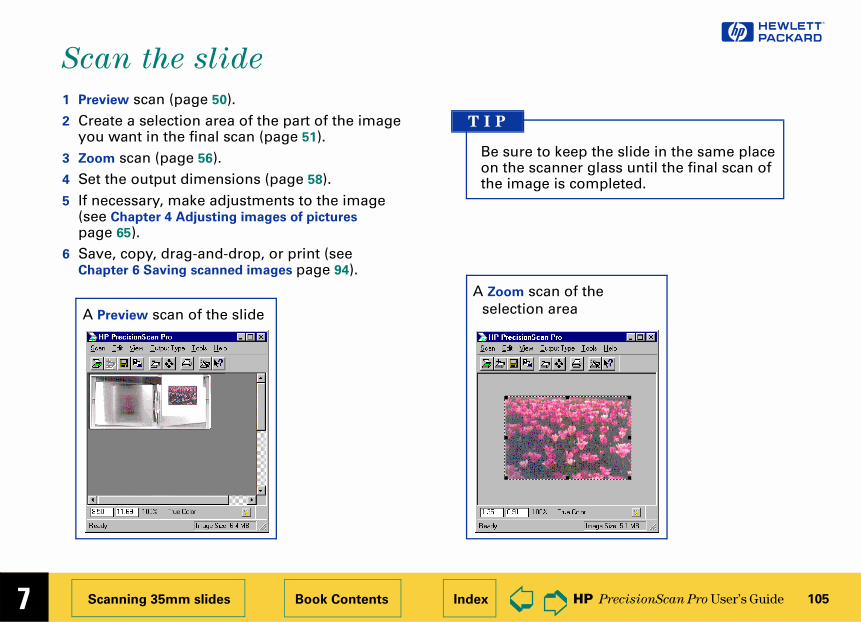
1 Preview scan (page 50).2 Create a selection area of the part of the image
you want in the final scan (page 51).3 Save, copy, drag-and-drop, or print (see Chapter
6 Saving scanned images page 94).
Optional adjustments
(See Chapter 4 Adjusting images of pictures page 65.)■ Zoom scan to see the image at closer range
(page 56).■ Set the output dimensions if you want to save
the image as a different size (page 58).■ Choose an Output Type if you need to save the
image with different colors. For example, you could save a color image as a grayscale or a 256 color image (page 62).
To adjust an ithe True Color
Color output t■ Sharpen (pa■ Adjust expo
(page 70)■ Adjust colo
To adjust an ithe Grayscale type:■ Sharpen (pa■ Adjust expo
(page 70)
To adjust an ia Black & Whit
■ Sharpen (pa■ Adjust black
threshold (pcolor chann
Be sure to keep the original in the same place on the scanner glass until the final scan of the image is completed.
T I P
�
3 HP PrecisionScan Pro User’s Guide 50
an displayed in the preview area
Scanning pictures Book Contents Index
➮
➮
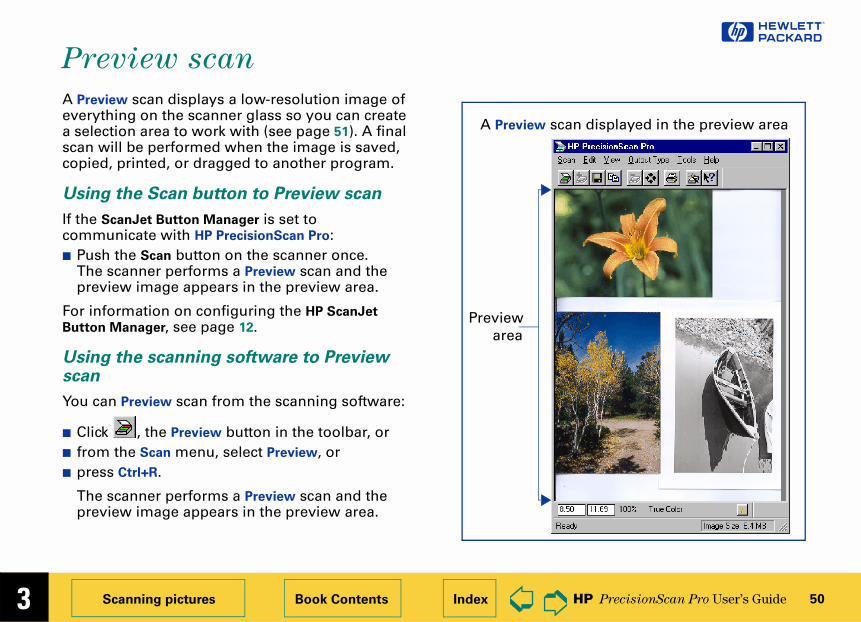
Preview scan
A Preview scan displays a low-resolution image of everything on the scanner glass so you can create a selection area to work with (see page 51). A final scan will be performed when the image is saved, copied, printed, or dragged to another program.
Using the Scan button to Preview scan
If the ScanJet Button Manager is set to communicate with HP PrecisionScan Pro:■ Push the Scan button on the scanner once.
The scanner performs a Preview scan and the preview image appears in the preview area.
For information on configuring the HP ScanJet
Button Manager, see page 12.
Using the scanning software to Preview scan
You can Preview scan from the scanning software:
■ Click , the Preview button in the toolbar, or■ from the Scan menu, select Preview, or■ press Ctrl+R.
The scanner performs a Preview scan and the preview image appears in the preview area.
A Preview sc
Previewarea
�
3 HP PrecisionScan Pro User’s Guide 51
Scanning pictures Book Contents Index
➮
➮
Create a selection area
You must create a selection area to indicate the part of the image you want to save to a file, copy, print, or drag-and-drop.
The area you select will be enclosed by a selection border, which you can resize later (see page 55).
There are several ways to create a selection area:■ click (see page 52)■ draw (see page 53)■ select everything on the scanner glass (see
page 54)
The selection area determines the part of the image that is included in the final scan when you save, copy, print, or drag-and-drop.
If no selection area exists: ■ you cannot perform drag-and-drop■ the entire area of the scanner glass will be
included when you save, copy, or print
T I P
�
3 HP PrecisionScan Pro User’s Guide 52
lection border around the
Scanning pictures Book Contents Index
➮
➮
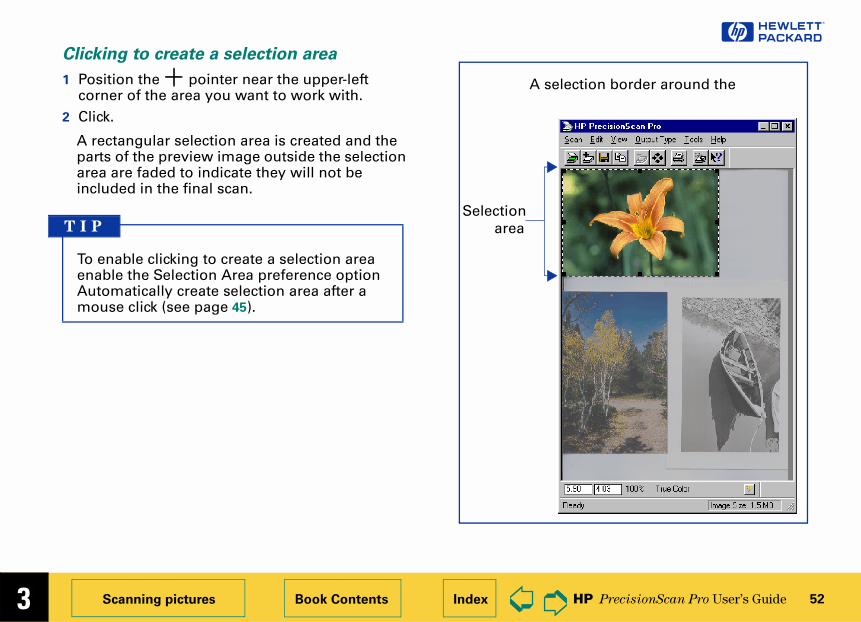
Clicking to create a selection area
1 Position the pointer near the upper-left corner of the area you want to work with.
2 Click.
A rectangular selection area is created and the parts of the preview image outside the selection area are faded to indicate they will not be included in the final scan.
To enable clicking to create a selection area enable the Selection Area preference option Automatically create selection area after a mouse click (see page 45).
T I P
A se
Selectionarea
�
3 HP PrecisionScan Pro User’s Guide 53
he selection area
e the selection area so you can ent one.it menu, select Clear Selection, or
border surrounds the selection
ppear on the corners and in the each side of the selection
e inside the selection border ivid.e outside the selection border aded.
Scanning pictures Book Contents Index
➮
➮
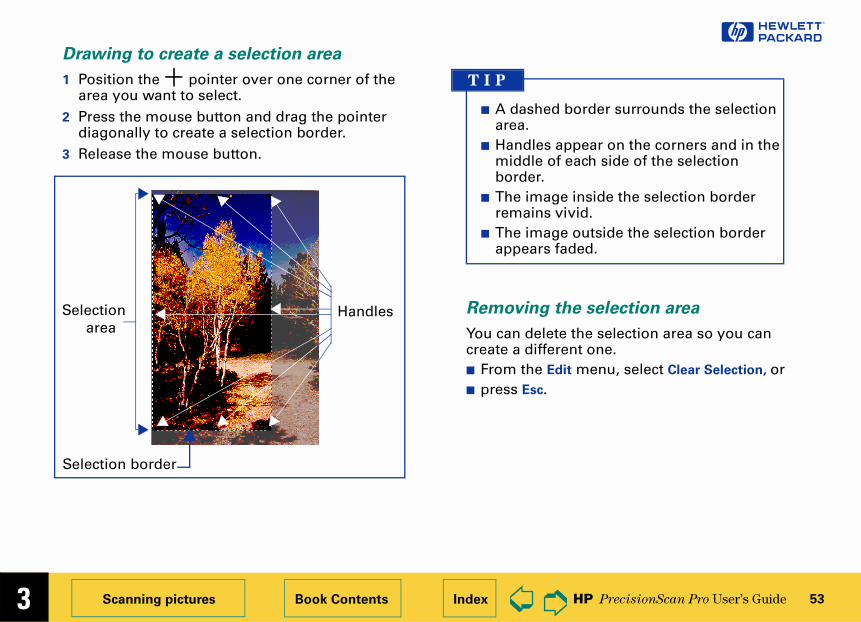
Drawing to create a selection area
1 Position the pointer over one corner of the area you want to select.
2 Press the mouse button and drag the pointer diagonally to create a selection border.
3 Release the mouse button.
Removing t
You can deletcreate a differ■ From the Ed
■ press Esc.
Selectionarea
Handles
Selection border
■ A dashedarea.
■ Handles amiddle ofborder.
■ The imagremains v
■ The imagappears f
T I P
�
3 HP PrecisionScan Pro User’s Guide 54
lection border around the entire
Scanning pictures Book Contents Index
➮
➮
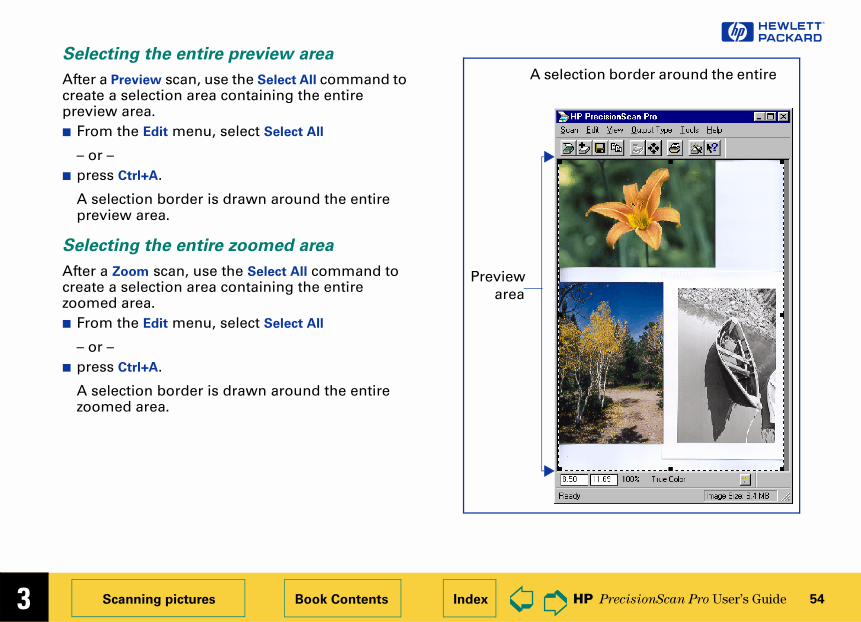
Selecting the entire preview area
After a Preview scan, use the Select All command to create a selection area containing the entire preview area.■ From the Edit menu, select Select All
– or –■ press Ctrl+A.
A selection border is drawn around the entire preview area.
Selecting the entire zoomed area
After a Zoom scan, use the Select All command to create a selection area containing the entire zoomed area.■ From the Edit menu, select Select All
– or –■ press Ctrl+A.
A selection border is drawn around the entire zoomed area.
A se
Previewarea
�
3 HP PrecisionScan Pro User’s Guide 55
ensions tool
he fields in the Selection Area
ea of the Dimensions tool to define of the selection area. (See page 30 t the Dimensions tool.)ols menu, select Dimensions.
ions tool appears.t button in the Units field and select u want to work with.idth of the selection area, type the in the Width field of the Selection
ions area. same aspect ratio for the selection the Selection Area Dimensions area e proportional to the new width s Enter,
existing Selection Area Dimensions value, click in any other field of the tool.
Scanning pictures Book Contents Index
➮
➮
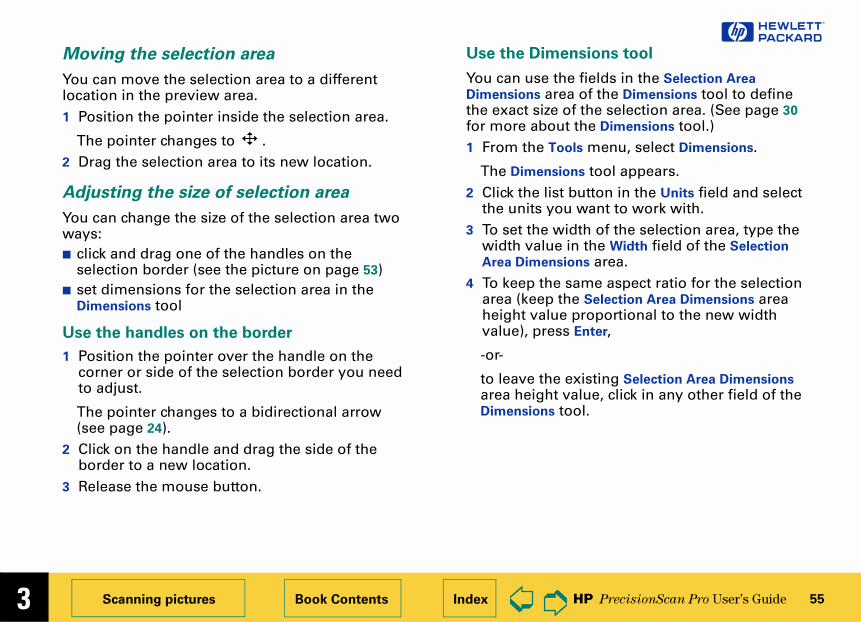
Moving the selection area
You can move the selection area to a different location in the preview area.1 Position the pointer inside the selection area.
The pointer changes to .2 Drag the selection area to its new location.
Adjusting the size of selection area
You can change the size of the selection area two ways:■ click and drag one of the handles on the
selection border (see the picture on page 53)■ set dimensions for the selection area in the
Dimensions tool
Use the handles on the border
1 Position the pointer over the handle on the corner or side of the selection border you need to adjust.
The pointer changes to a bidirectional arrow (see page 24).
2 Click on the handle and drag the side of the border to a new location.
3 Release the mouse button.
Use the Dim
You can use tDimensions arthe exact sizefor more abou1 From the To
The Dimens
2 Click the listhe units yo
3 To set the wwidth valueArea Dimens
4 To keep thearea (keep height valuvalue), pres
-or-
to leave thearea heightDimensions
�
3 HP PrecisionScan Pro User’s Guide 56
selection
Scanning pictures Book Contents Index
➮
➮
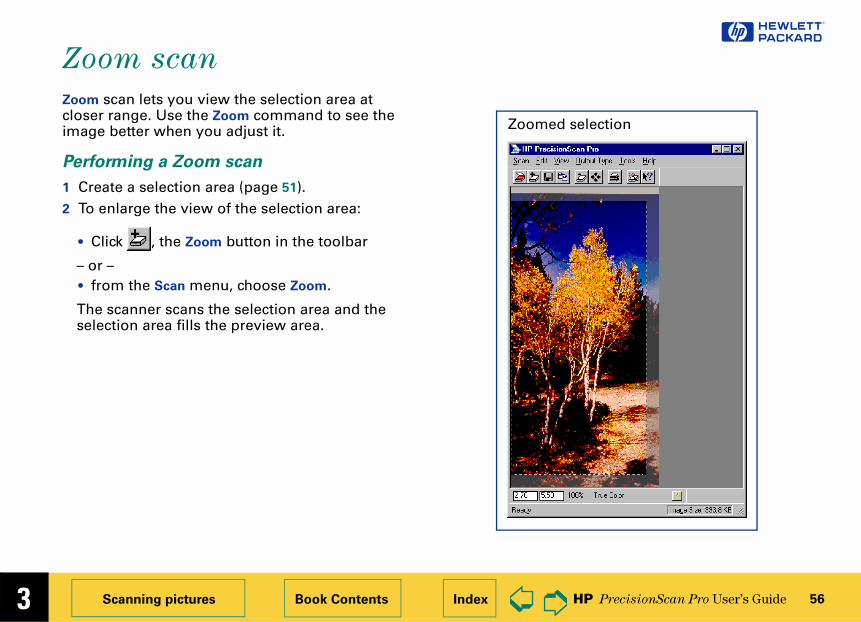
Zoom scan
Zoom scan lets you view the selection area at closer range. Use the Zoom command to see the image better when you adjust it.
Performing a Zoom scan
1 Create a selection area (page 51).2 To enlarge the view of the selection area:
• Click , the Zoom button in the toolbar
– or –• from the Scan menu, choose Zoom.
The scanner scans the selection area and the selection area fills the preview area.
Zoomed
�
3 HP PrecisionScan Pro User’s Guide 57
o Zoom)
ew menu, choose Undo Zoom.
image appears with all settings
ferent area of the preview image.
e Zoom button in the toolbar,
an menu, choose Zoom.
r scans the selection area.
the new selection area appears
w image
Zoom
Second zoomed image
➌
Scanning pictures Book Contents Index
➮
➮
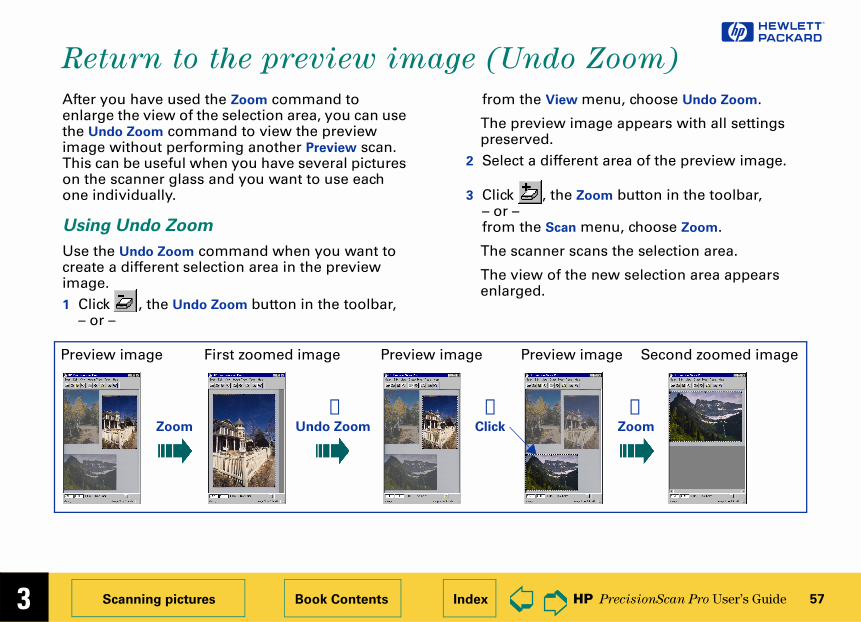
Return to the preview image (Und
After you have used the Zoom command to enlarge the view of the selection area, you can use the Undo Zoom command to view the preview image without performing another Preview scan. This can be useful when you have several pictures on the scanner glass and you want to use each one individually.
Using Undo Zoom
Use the Undo Zoom command when you want to create a different selection area in the preview image.1 Click , the Undo Zoom button in the toolbar,
– or –
from the Vi
The previewpreserved.
2 Select a dif
3 Click , th– or –from the Sc
The scanne
The view ofenlarged.
Preview image
Zoom
First zoomed image Preview image Previe
Undo Zoom Click
➊ ➋
�
3 HP PrecisionScan Pro User’s Guide 58
cedure for setting output dimensions rder: units of measurement you want to page 59).lection area (page 51) and adjust the election area (page 55).utput dimensions (page 60).
or more about the Dimensions tool.
400% Scaled imaget,e,y, org-and-p
Scanning pictures Book Contents Index
➮
➮
Set the output dimensions
To get the best quality image, determine in advance the physical dimensions you want for the image and set those dimensions with the Dimensions tool in the scanning software. For example, if the original is smaller than the size you need the image to be in another program, resize it now. Resizing an image in the destination program can cause the image to become fuzzy or jagged.
The usual profollows this o1 Choose the
work with (2 Create a se
size of the s3 Adjust the o
See page 30 f
Original picture Create a selectionarea
Set outputdimensionsby scaling
Prinsavcopdradro
➊ ➌Set units
➋
Scale
�
3 HP PrecisionScan Pro User’s Guide 59
lection area (page 51).t button in the Units field of the tool and select a unit of nt.
hange units:t width value in both Width ngest height value in both Height ngest width value in the info bar
t height value in the info bar
Scanning pictures Book Contents Index
➮
➮
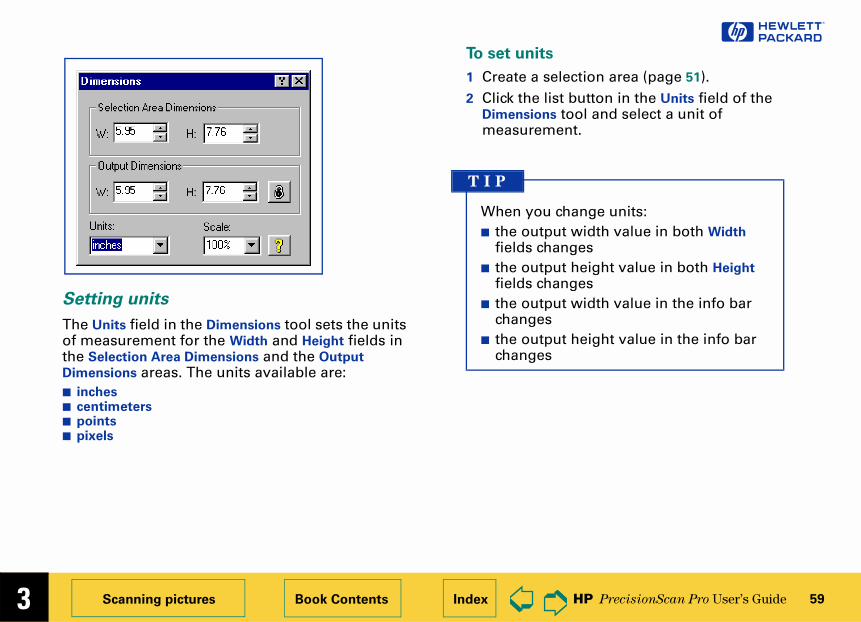
Setting units
The Units field in the Dimensions tool sets the units of measurement for the Width and Height fields in the Selection Area Dimensions and the Output
Dimensions areas. The units available are:■ inches■ centimeters■ points■ pixels
To set units
1 Create a se2 Click the lis
Dimensions measureme
When you c■ the outpu
fields cha■ the outpu
fields cha■ the outpu
changes■ the outpu
changes
T I P
�
3 HP PrecisionScan Pro User’s Guide 60
hange the Scale value, you will image change in the preview
t when Scale is set to 100%
t when Scale is set to 50%
Scanning pictures Book Contents Index
➮
➮
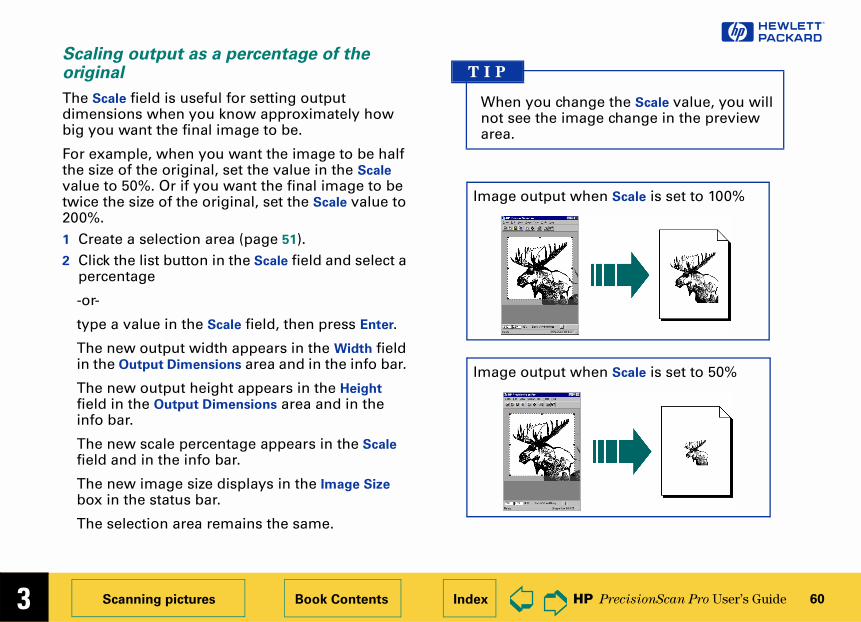
Scaling output as a percentage of the original
The Scale field is useful for setting output dimensions when you know approximately how big you want the final image to be.
For example, when you want the image to be half the size of the original, set the value in the Scale value to 50%. Or if you want the final image to be twice the size of the original, set the Scale value to 200%.1 Create a selection area (page 51).2 Click the list button in the Scale field and select a
percentage
-or-
type a value in the Scale field, then press Enter.
The new output width appears in the Width field in the Output Dimensions area and in the info bar.
The new output height appears in the Height field in the Output Dimensions area and in the info bar.
The new scale percentage appears in the Scale field and in the info bar.
The new image size displays in the Image Size box in the status bar.
The selection area remains the same.
When you cnot see the area.
T I P
Image outpu
Image outpu
�
3 HP PrecisionScan Pro User’s Guide 61
ues for output dimension
he output dimensions you have u can change the size of the selection hanging the output dimensions.
lection area (page 51).es for width and height in the Output
area of the Dimensions tool.
ize of the selection area (see
n area will be resized proportionally.
dimensions remain the same.
Scanning pictures Book Contents Index
➮
➮
Typing values for output width and height
You can type the output dimensions when you know exactly how big you want the final image to be.1 Create a selection area (page 51).2 Click in the Width field of the Output Dimensions
area of the Dimensions tool and type the value for the width
3 Press Tab or Enter,
– or –
click in the Height field of the Output Dimensions area and type the value for the height, then press Tab or Enter.• The new output width appears in the Width
field of the Output Dimensions area and in the info bar.
• The new output height appears in the Height field of the Output Dimensions area and in the info bar.
• The new scale percentage appears in the Scale field and in the info bar.
• The new image size displays in the Image Size box in the status bar.
• The selection area remains the same.
Locking val
You can lock tdefined so yoarea without c1 Create a se2 Set the valu
Dimensions
3 Click .4 Adjust the s
page 55).
The selectio
The output
�
3 HP PrecisionScan Pro User’s Guide 62
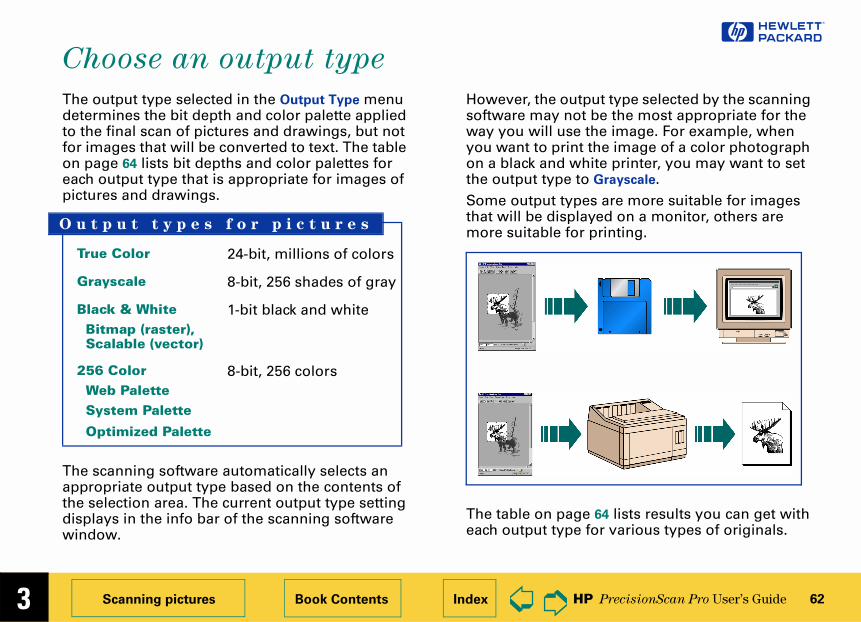
output type selected by the scanning not be the most appropriate for the se the image. For example, when
rint the image of a color photograph white printer, you may want to set e to Grayscale.types are more suitable for images splayed on a monitor, others are for printing.
age 64 lists results you can get with pe for various types of originals.
Scanning pictures Book Contents Index
➮
➮
Choose an output type
The output type selected in the Output Type menu determines the bit depth and color palette applied to the final scan of pictures and drawings, but not for images that will be converted to text. The table on page 64 lists bit depths and color palettes for each output type that is appropriate for images of pictures and drawings.
The scanning software automatically selects an appropriate output type based on the contents of the selection area. The current output type setting displays in the info bar of the scanning software window.
However, the software mayway you will uyou want to pon a black andthe output typSome output that will be dimore suitable
The table on peach output ty
True Color 24-bit, millions of colors
Grayscale 8-bit, 256 shades of gray
Black & WhiteBitmap (raster), Scalable (vector)
1-bit black and white
256 ColorWeb PaletteSystem Palette
Optimized Palette
8-bit, 256 colors
O u t p u t t y p e s f o r p i c t u r e s
�
3 HP PrecisionScan Pro User’s Guide 63
ults with images that will be -color display monitors, do not
Color Optimized Palette output
timized palette is used in an
te is unique to that image and e palette colors are applied to w that is displaying the image
other windows that are at the same time will be , because those other windows dard, system palettew displaying the image with the palette will be temporarily
with fewer colors when focus o a different window
Scanning pictures Book Contents Index
➮
➮
Changing the output type
1 Create a selection area (page 51).2 From the Output Type menu, choose an output
type for the image of the picture you scanned.
Make your output type choice based on:• whether the image will be displayed on a
monitor or printed in hardcopy• how many colors you want in the final scan• file size
After you select an output type from the Output
Type menu:• you will see the image change in the preview
area• the new output type displays in the info bar• the new image size displays in the status bar• a new sharpening level may appear in the
Sharpen Level tool• a new value may appear in the Output
Resolution tool
For best resused on 256use the 256
type. When an opimage:■ that palet
the uniquthe windo
■ colors in displayedcorrupteduse a stan
■ the windooptimizedrenderedchanges t
T I P
�
3 HP PrecisionScan Pro User’s Guide 64
f original
Black and white photograph
Black and white drawing
one-color tint image for printing
isplaying on a monitor
printing or displaying on a monitor; other program
age for resizing in another program
one-color tint image for displaying on a Web page
one-color tint image for displaying a presentation on a monitor
Scanning pictures Book Contents Index
➮
➮
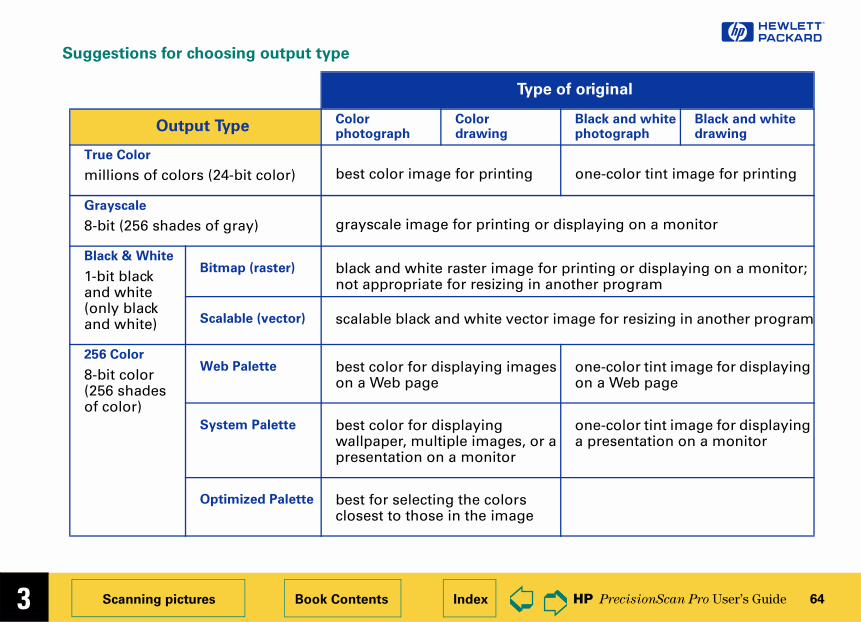
Suggestions for choosing output type
Type o
Output TypeColor photograph
Color drawing
True Color
millions of colors (24-bit color) best color image for printing
Grayscale
8-bit (256 shades of gray) grayscale image for printing or d
Black & White
1-bit black and white (only black and white)
Bitmap (raster) black and white raster image fornot appropriate for resizing in an
Scalable (vector) scalable black and white vector im
256 Color
8-bit color (256 shades of color)
Web Palette best color for displaying images on a Web page
System Palette best color for displaying wallpaper, multiple images, or a presentation on a monitor
Optimized Palette best for selecting the colors closest to those in the image
�
images of 4
adjustments
ution
r black and white bitmaps
l for black and white bitmaps
4➮
➮
Adjustingpictures
66 Tools for making
68 Sharpen
70 Adjust exposure
80 Adjust color
83 Set output resol
85 Set threshold fo
87 Set color channe
�
4 HP PrecisionScan Pro User’s Guide 66
t type affects which image s you can make
ilable for making adjustments to an ture depend on the Output Type you .
for color output types
h the True
Color n be
Adjusting images of
picturesBook Contents Index
➮
➮
Tools for making adjustments
The tools in the scanning software can be used to adjust the image of a picture before you save, copy, drag-and-drop, or print the image.
After you have selected an output type (page 62) and cropped the image by creating a selection area (page 51), the adjustments you can make and the tools to use are:
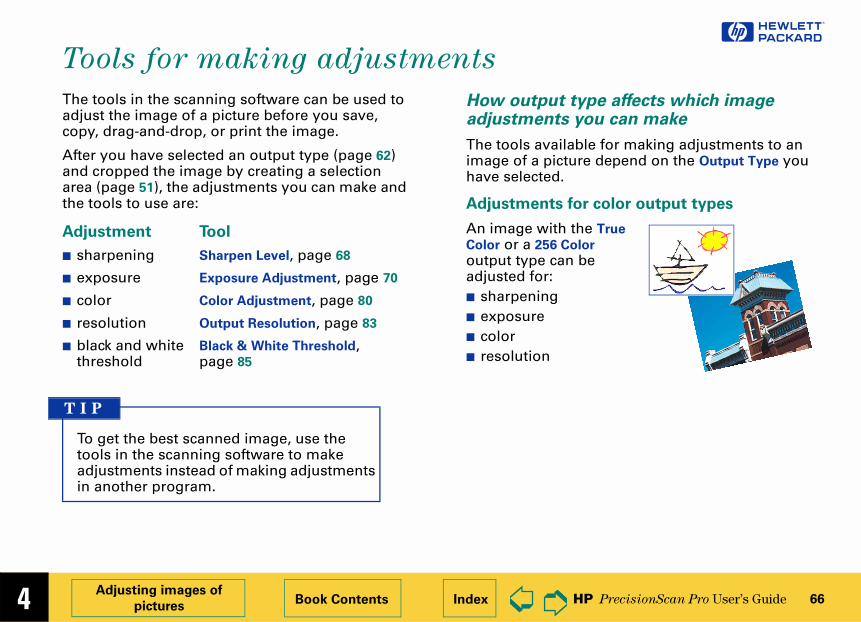
How outpuadjustment
The tools avaimage of a pichave selected
Adjustments
An image witColor or a 256
output type caadjusted for:■ sharpening■ exposure■ color■ resolution
Adjustment Tool
■ sharpening Sharpen Level, page 68
■ exposure Exposure Adjustment, page 70
■ color Color Adjustment, page 80
■ resolution Output Resolution, page 83
■ black and whitethreshold
Black & White Threshold, page 85
To get the best scanned image, use the tools in the scanning software to make adjustments instead of making adjustments in another program.
T I P
�
4 HP PrecisionScan Pro User’s Guide 67
for Black & White Bitmap ut type
the Black &
raster)
n be
hite
for Black & White Scalable ut type
the Black &
(vector)
nnot be any of the
Adjusting images of
picturesBook Contents Index
➮
➮
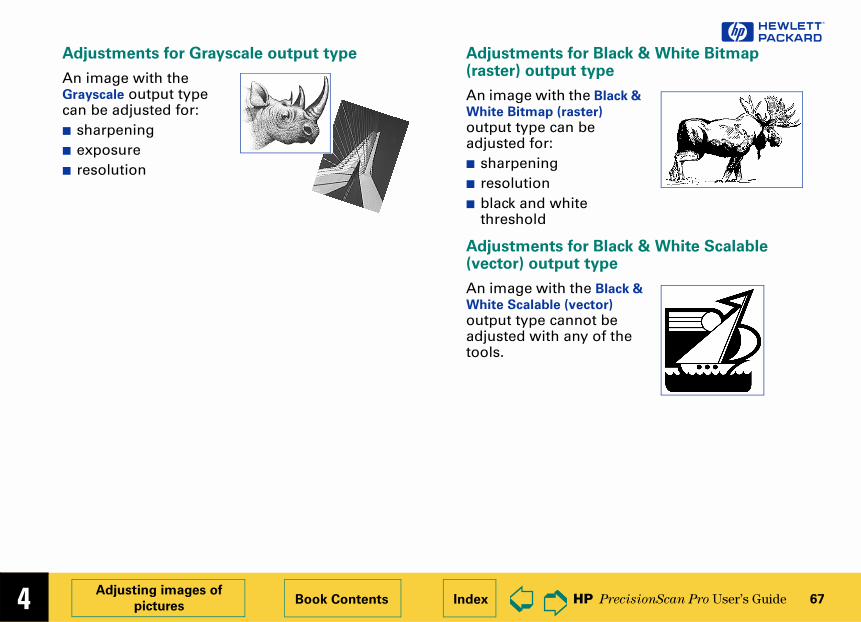
Adjustments for Grayscale output type
An image with the Grayscale output type can be adjusted for:■ sharpening■ exposure■ resolution
Adjustments(raster) outp
An image withWhite Bitmap (
output type caadjusted for:■ sharpening■ resolution■ black and w
threshold
Adjustments(vector) outp
An image withWhite Scalable
output type caadjusted withtools.
�
4 HP PrecisionScan Pro User’s Guide 68
g software automatically optimal sharpen level for the applied to the image.
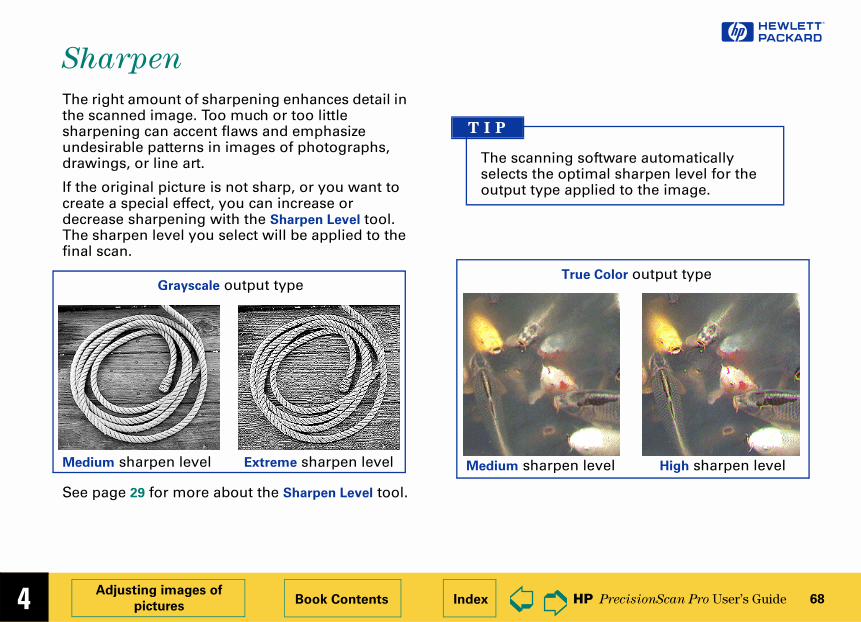
True Color output type
en level High sharpen level
Adjusting images of
picturesBook Contents Index
➮
➮
Sharpen
The right amount of sharpening enhances detail in the scanned image. Too much or too little sharpening can accent flaws and emphasize undesirable patterns in images of photographs, drawings, or line art.
If the original picture is not sharp, or you want to create a special effect, you can increase or decrease sharpening with the Sharpen Level tool. The sharpen level you select will be applied to the final scan.
See page 29 for more about the Sharpen Level tool.
Grayscale output type
Medium sharpen level Extreme sharpen level
The scanninselects the output type
T I P
Medium sharp
�
4 HP PrecisionScan Pro User’s Guide 69
e default sharpen level
e AutoSharpen button in the Sharpen
al sharpen level determined by the software is applied to the Sharpen
.t of the change to the sharpen level en in the preview area.
change the sharpen level for of a picture, you will see the
ange in the preview area.nge the sharpen levelrpen Level tool and ge the output type, pply AutoSharpen w output type by clicking .
Adjusting images of
picturesBook Contents Index
➮
➮
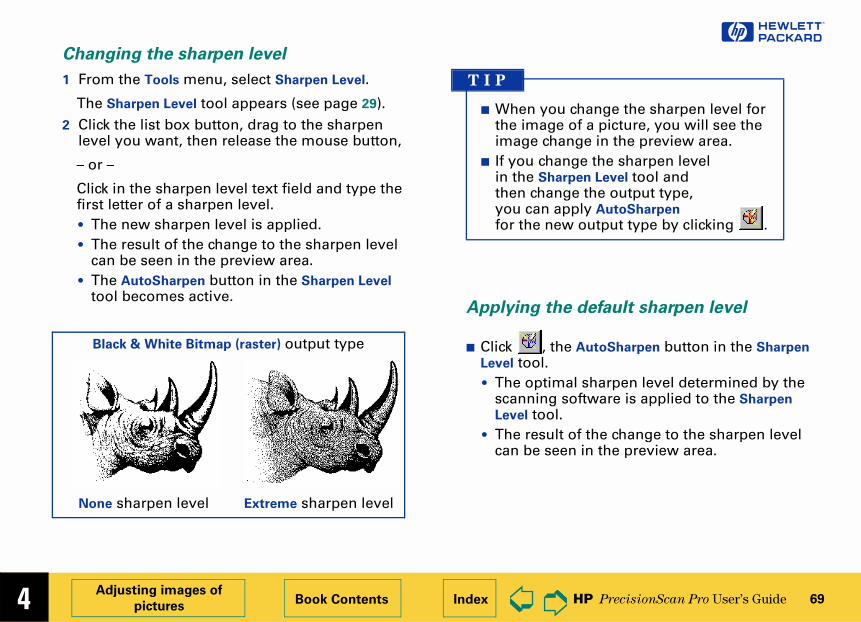
Changing the sharpen level
1 From the Tools menu, select Sharpen Level.
The Sharpen Level tool appears (see page 29).2 Click the list box button, drag to the sharpen
level you want, then release the mouse button,
– or –
Click in the sharpen level text field and type the first letter of a sharpen level.• The new sharpen level is applied.• The result of the change to the sharpen level
can be seen in the preview area.• The AutoSharpen button in the Sharpen Level
tool becomes active.Applying th
■ Click , thLevel tool.• The optim
scanningLevel tool
• The resulcan be se
Black & White Bitmap (raster) output type
None sharpen level Extreme sharpen level
■ When youthe imageimage ch
■ If you chain the Sha
then chanyou can afor the ne
T I P
�
4 HP PrecisionScan Pro User’s Guide 70
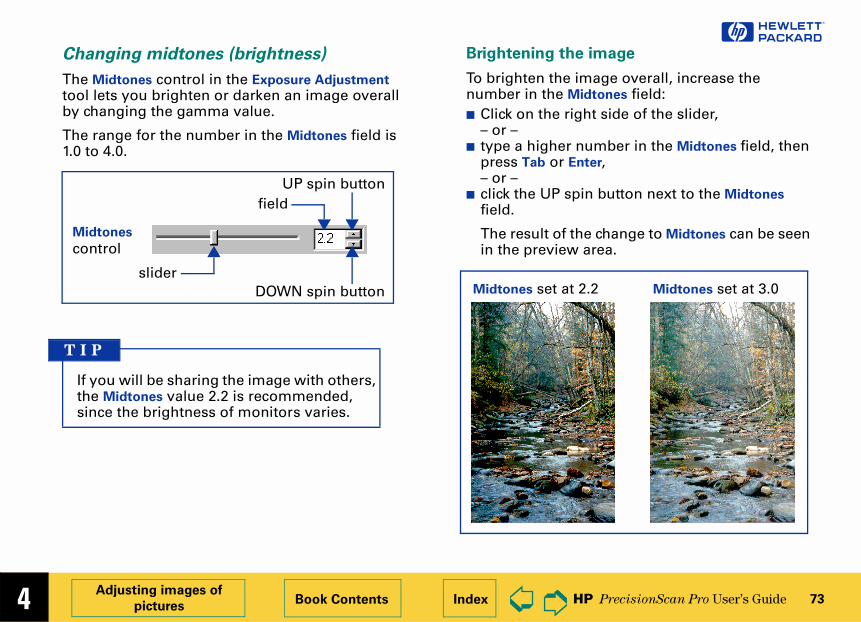
xposure Adjustment tool
ols menu, select Exposure
e Adjustment tool appears. (See
following sections for using the justment tool:hlights on page 71
adows on page 72
dtones (brightness) on page 73
clipping of pixels on page 76
output levels on page 78
e default exposure settings
to button in the Exposure Adjustment
al exposure settings determined by ing software are applied to the
Adjustment tool.ts of the changes to the exposure an be seen in the preview area.
Adjusting images of
picturesBook Contents Index
➮
➮
Adjust exposure
The scanning software automatically selects the optimal exposure settings for the output type applied to the image of a picture. However, if the original picture needs the brightness or contrast adjusted, you can use the Exposure Adjustment tool to increase or decrease:■ highlights (see page 71)■ shadows (see page 72)■ midtones (gamma) (see page 73)■ clipping of white and black pixels (see page 76)■ output levels for white and black pixels (see
page 78)
The exposure settings you select will be applied to the final scan.
You can also use the Exposure Adjustment tool to:■ view the distribution of pixels (see page 74)■ read the RGB values of the pixels in the image
(see page 74).
The Exposure Adjustment tool is active for the color and grayscale output types.
Using the E
1 From the To
Adjustment.
The Exposur
page 32.)2 Refer to the
Exposure Ad
■ Changing hig
■ Changing sh
■ Changing mi
■ Checking for
■ Setting pixel
Applying th
■ Click the Au
tool.• The optim
the scannExposure
• The resulsettings c
�
4 HP PrecisionScan Pro User’s Guide 71
details in light areas
etails in the light areas of the image, number in the Highlights field: left side of the slider,
r number in the Highlights field, then r Enter,
WN spin button next to the Highlights
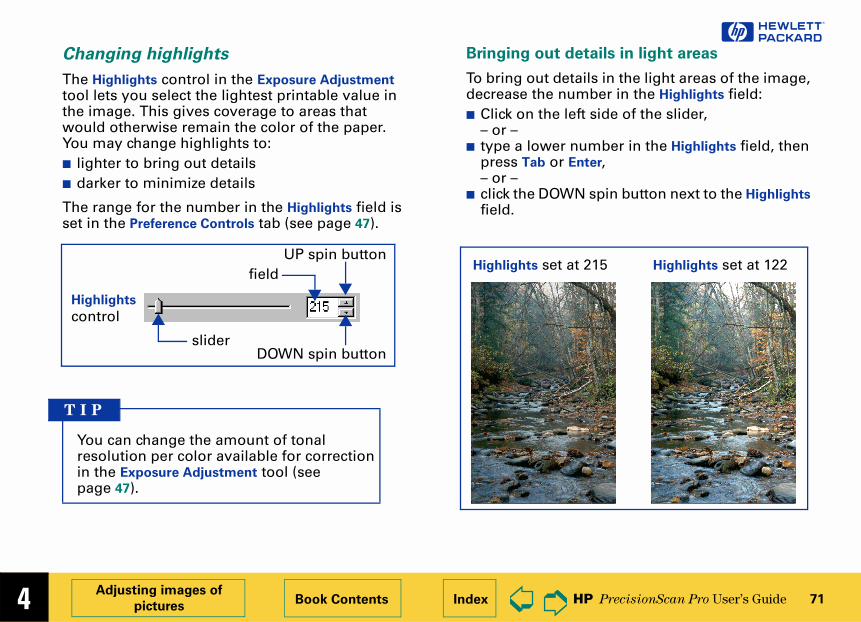
Highlights set at 122t at 215
Adjusting images of
picturesBook Contents Index
➮
➮
Changing highlights
The Highlights control in the Exposure Adjustment tool lets you select the lightest printable value in the image. This gives coverage to areas that would otherwise remain the color of the paper. You may change highlights to:■ lighter to bring out details■ darker to minimize details
The range for the number in the Highlights field is set in the Preference Controls tab (see page 47).
Bringing out
To bring out ddecrease the ■ Click on the
– or –■ type a lowe
press Tab o– or –
■ click the DOfield.
slider
field
DOWN spin button
UP spin button
Highlights
control
You can change the amount of tonal resolution per color available for correction in the Exposure Adjustment tool (see page 47).
T I P
Highlights se
�
4 HP PrecisionScan Pro User’s Guide 72
details in dark areas
etails in the dark areas of the image, number in the Shadows field: left side of the slider,
r number in the Shadows field, then r Enter,
WN spin button next to the Shadows
f the change to Shadows can be seen ew area.
Shadows set at 3at 10
Adjusting images of
picturesBook Contents Index
➮
➮
Changing shadows
The Shadows control in the Exposure Adjustment tool lets you select the darkest printable value in the image. This allows you to bring out detail in areas that would otherwise become black. You may make dark parts of images:■ lighter to bring out details■ darker to minimize details
The range for the number in the Shadows field is set in the Preference Controls tab (see page 47).
Bringing out
To bring out ddecrease the ■ Click on the
– or –■ type a lowe
press Tab o– or –
■ click the DOfield.
The result oin the previ
Shadows
slider
field
DOWN spin button
UP spin button
control
A Shadows value close to or at zero generally produces an image with better shadow detail.
T I P
Shadows set
�
4 HP PrecisionScan Pro User’s Guide 73
the image
e image overall, increase the Midtones field: right side of the slider,
er number in the Midtones field, then r Enter,
spin button next to the Midtones
f the change to Midtones can be seen ew area.
Midtones set at 3.0at 2.2
Adjusting images of
picturesBook Contents Index
➮
➮
Changing midtones (brightness)
The Midtones control in the Exposure Adjustment tool lets you brighten or darken an image overall by changing the gamma value.
The range for the number in the Midtones field is 1.0 to 4.0.
Brightening
To brighten thnumber in the■ Click on the
– or –■ type a high
press Tab o– or –
■ click the UPfield.
The result oin the previ
Midtones
slider
field
DOWN spin button
UP spin button
control
If you will be sharing the image with others, the Midtones value 2.2 is recommended, since the brightness of monitors varies.
T I P
Midtones set
�
4 HP PrecisionScan Pro User’s Guide 74
the settings for Highlights and does not change the graph in ram. the selection area changes the he histogram.nes setting is not represented in ram. in the histogram represents
ribution in the input image, not ge that will be output.
nder the eyedropper pointer
Adjusting images of
picturesBook Contents Index
➮
➮
Pixel distribution histogram
The histogram in the Exposure Adjustment tool is a graph of the distribution of pixels in the selection area. The vertical lines in the histogram show the current settings for Shadows and Highlights.
➊The magenta line in the histogram represents the current setting for Shadows, the darkest areas in the image.
➋The red line in the histogram represents the current setting for Highlights, the lightest areas in the image.
➌The turquoise line appears in the histogram when either eyedropper pointer is positioned over the image. It shows you where the pixels at that place in the image occur in the histogram.
Shadows Highlights
➊ ➋
■ ChangingShadows the histog
■ Changinggraph in t
■ The Midto
the histog■ The graph
pixel distin the ima
T I P
Pixels u➌
�
4 HP PrecisionScan Pro User’s Guide 75
ointer over the image.values and pixel color appear in the r.oise line appears in the histogram.
me eyedropper button again.eter dims.
er returns to normal.
while the eyedropper pointer is age unless you want to change for Highlights or Shadows.
Adjusting images of
picturesBook Contents Index
➮
➮
RGB Meter
You can view the RGB values and pixel color for any spot in a color or grayscale image with the RGB Meter in the Exposure Adjustment tool.
Using the RGB Meter
1 Click either eyedropper button in the Exposure
Adjustment tool:■ When you click , the pointer changes to this:
.■ When you click , the pointer changes to this:
.
2 Move the p• The RGB
RGB Mete
• The turqu
3 Click the sa• The RGB M
• The point➊ ➋
➊ RGB values
➋ Pixel color
Do not clickover the imthe setting
T I P
�
4 HP PrecisionScan Pro User’s Guide 76
Appearance whenneither Exposure Alert
button is on
rance whenite Exposure Alert
, is turned on
Appearance whenthe black Exposure Alert
button, is turned on
Adjusting images of
picturesBook Contents Index
➮
➮
Checking for clipping of pixels
The Exposure Alert buttons in the Exposure
Adjustment tool warn you of areas of a color or grayscale image that contain no detail in the lightest and darkest areas of the image. The lightest area will print as the color of the paper, with no ink or toner, and therefore no detail. The darkest areas will print with the blackest color of ink or toner, saturating the area with the same color of black with no visible detail.
The Exposure Alert buttons in the Exposure
Adjustment tool are:
■ – for viewing white pixels that will be clipped in the final scan
■ – for viewing black pixels that will be clipped in the final scan
Appeathe whbutton
�
4 HP PrecisionScan Pro User’s Guide 77
removing clipped dark areas
e black Exposure Alert button.
eas in the image that will print as ppear white in the preview area.
ows control, click the DOWN spin atedly until the clipped pixels rom the image.f the change to Shadows can be seen ew area.
e black Exposure Alert button again.
e Alert button turns off.
Adjusting images of
picturesBook Contents Index
➮
➮
Viewing and removing clipped light areas
You can adjust the light or dark areas to add detail back to them.1 Click , the white Exposure Alert button.
The light areas in the image that will print as pure white appear black in the preview area.
2 In the Highlights control, click the UP spin button repeatedly until the clipped pixels disappear from the image.The result of the change to Highlights can be seen in the preview area.
3 Click , the white Exposure Alert button again.
The Exposure Alert button turns off.
Viewing and
1 Click , th
The dark arpure black a
2 In the Shad
button repedisappear fThe result oin the previ
3 Click , th
The Exposur
�
4 HP PrecisionScan Pro User’s Guide 78
tput levels
t Levels control in the Exposure
ol to create interesting effects in tures.
r the numbers in the White and Black in the Preference Controls tab (see
tput Levels checkbox in the Exposure
tool to select it.
nd Black output levels controls e Exposure Adjustment tool. one side of a slider,
ent number in the White or Black
ress Tab or Enter,
or the DOWN spin button next to the ck field.
f the changes to Output Levels can be preview area.
Adjusting images of
picturesBook Contents Index
➮
➮
Setting pixel output levels
The Output Levels control in the Exposure
Adjustment tool lets you create interesting effects for images of pictures.
When you change the White output level value to 0 and the Black output level value to 255, the colors in the image reverse.
Changing ou
Use the Outpu
Adjustment toimages of pic
The ranges fofields are set page 47).1 Click the Ou
Adjustment
The White aappear in th
2 Click on the
– or –
type a differfield, then p
– or –
click the UPWhite or Bla
The result oseen in the
Appearance withWhite control = 255Black control = 0
Appearance withWhite control = 0Black control = 255
�
4 HP PrecisionScan Pro User’s Guide 79
Appearance withWhite control = 255Black control = 0
ith= 255 200
Appearance withWhite control = 0Black control = 255
Adjusting images of
picturesBook Contents Index
➮
➮
If you want to create an image to use as a backdrop for dark text on a light background, such as an overhead transparency, increase the Black output level value until the image is as faint as you like.
If you want to create an image to use as a backdrop for light text on a dark background, such as with color slides, decrease the White output level value until the image is as faint as you like.
Click the Auto button in the Exposure
Adjustment tool to change all the exposure settings to the optimal exposure settings determined by the scanning software
T I PAppearance wWhite control Black control =
�
4 HP PrecisionScan Pro User’s Guide 80
olor balance
Wheel in the Color Adjustment tool to balance (hue).
ndicator circle
ge has too olor, move ircle toward ide r) on the
icator circle use, or’s triangle
f the change an be seen ew area.
e color for photographs that are ve too much of one color.
Indicator circle inthe Color Wheel
Adjusting images of
picturesBook Contents Index
➮
➮
Adjust color
The scanning software automatically selects the optimal color settings for any color output type applied to the image. If the overall color in the original picture is out of balance, or the picture needs more or less color, you can use the Color
Adjustment tool to increase or decrease:■ color balance, or hue (see page 80)■ color saturation (see page 81)
The Color Adjustment tool is active for these output types:■ True Color
■ 256 Color Web Palette
■ 256 Color System Palette
■ 256 Color Optimized Palette
1 From the Tools menu, select Color Adjustment.
The Color Adjustment tool appears (see page 33).2 Change the color balance or saturation as
described below.
The color settings you select will be applied to the final scan.
Changing c
Use the Color
change color
Moving the i
When the imamuch of one cthe indicator cthe opposite s(opposite coloColor Wheel.■ drag the ind
with the mo■ click a color
The result oto the hue cin the previ
Adjust imagfaded or ha
T I P
�
4 HP PrecisionScan Pro User’s Guide 81
olor saturation
t the amount of color in the image ation slider control in the Color
ol. The higher the number in the d, the more vivid the colors will be in low number in the Saturation field ge diluted colors.
the
d is
he change to the saturation value the preview area.
e amount of color
umber in the Saturation field to make mage more vivid: right side of the slider,
r number in the Saturation field, then r Enter,
spin button next to the Saturation
he amount of color
number in the Saturation field to r in the image:
Adjusting images of
picturesBook Contents Index
➮
➮
To correct the excess red in the picture below, the indicator circle can be moved into the cyan area of the Color Wheel.
The hue of an image can be changed to create a different effect.
Changing c
You can adjuswith the Satur
Adjustment toSaturation fielthe image. A gives the ima
The range fornumber in theSaturation fiel0 to 150.
The result of tcan be seen in
Increasing th
Increase the ncolors in the i■ Click on the
– or –■ type a highe
press Tab o– or –
■ click the UPfield.
Decreasing t
Decrease the dilute the colo
movedindicator circle
Very red Less red
movedindicator circle
Original Special effect
�
4 HP PrecisionScan Pro User’s Guide 82
e default color settings
to button in the Color Adjustment tool.al color settings determined by the
software are applied to the Color
t tool.ts of the changes to the color settings en in the preview area.
Adjusting images of
picturesBook Contents Index
➮
➮
■ Click on the left side of the slider,– or –
■ type a lower number in the Saturation field, then press Tab or Enter,– or –
■ click the DOWN spin button next to the Saturation field.
Applying th
■ Click the Au
• The optimscanningAdjustmen
• The resulcan be se
Saturation set at 100
Saturation set at 150
Saturation set at 75
�
4 HP PrecisionScan Pro User’s Guide 83
settings for photographs
guidelines to set output resolution ack and white photographs.e output resolution setting when:
to display the image on a monitor in get type is 256 Color Web Palette, 256
em Palette, 256 Color Optimized
Grayscale
he output resolution setting when:to print the image on a 300 DPI
t type is True Color, 256 Color
Palette, or Grayscale
he output resolution setting when:to print the image on the Smart printer or a 600 DPI printer
ge images, higher resolution does image quality, but does increase of bytes required to store the
Adjusting images of
picturesBook Contents Index
➮
➮
Set output resolution
To keep file size small, shorten printing time, and use less memory, use the lowest possible output resolution setting for an image of a picture.
The output resolution for the image in the selection area is set in the Output Resolution tool.
The Output Resolution tool is active for these output types:■ True Color
■ Grayscale
■ 256 Color Web Palette
■ 256 Color System Palette
■ 256 Color Optimized Palette
■ Black & White Bitmap (raster)
1 From the Tools menu, select Output Resolution.
The Output Resolution tool appears (see page 27).
2 Read the following sections before you change the value for output resolution in the Output
Resolution tool.
The output resolution setting displayed in the Output Resolution tool will be applied to the final scan.
Resolution
Follow these for color or bl■ Use 75 as th
• you plan a Web pa
• the outpuColor Syst
Palette, or
■ Use 100 as t• you plan
printer• the outpu
Optimized
■ Use 150 as t• you plan
HP Photo
For Web panot improvethe numberimage.
T I P
�
4 HP PrecisionScan Pro User’s Guide 84
t type is 256 Color Optimized Palette, or Black & White Bitmap (raster)
he output resolution setting when:to print the image on the Smart printer or a 600 DPI printert type is 256 Color Optimized Palette, or Black & White Bitmap (raster)
the output resolution setting when:to print the image on a 1200 DPI
t type is 256 Color Optimized Palette, or Black & White Bitmap (raster)
e default resolution
e AutoResolution button in the lution tool.al resolution setting determined by ing software is applied to the Output
tool.t of the change to the resolution nnot be seen in the preview area.
nge the resolution settings available ution tool’s list box (see page 46).
Adjusting images of
picturesBook Contents Index
➮
➮
• the output type is True Color, 256 Color
Optimized Palette, or Grayscale
• you will not be enlarging the photograph (use a higher resolution if you scale the image to greater than 100% of the original’s size)
■ Use 300 as the output resolution setting when:• you plan to print the image on a 1200 DPI
printer• the output type is True Color, 256 Color
Optimized Palette, or Grayscale
• you will not be enlarging the photograph (use a higher resolution if you scale the image to greater than 100% of the original’s size)
Resolution settings for drawings
Follow these guidelines for setting output resolution for images of color or black and white drawings.■ Use 75 as the output resolution setting when:
• you plan to display the image on a monitor in a Web page
• the output type is 256 Color Web Palette, 256
Color System Palette, 256 Color Optimized
Palette, Grayscale, or Black & White Bitmap (raster)
■ Use 300 as the output resolution setting when:• you plan to print the image on a 300 DPI
printer
• the outpuGrayscale,
■ Use 600 as t• you plan
HP Photo• the outpu
Grayscale,■ Use 1200 as
• you plan printer
• the outpuGrayscale,
Applying th
■ Click , thOutput Reso
• The optimthe scannResolution
• The resulsetting ca
You can chain the Resol
T I P
�
4 HP PrecisionScan Pro User’s Guide 85
itmaps
Image of a colorphotograph withthe True Color
output type
hite
) outputackeshold
Adjusting images of
picturesBook Contents Index
➮
➮
Set threshold for black and white b
When you want to save a black and white image from a color or black and white photograph, you can often improve the result by changing the threshold for the division between black and white pixels.
The black and white threshold can be changed with the Black & White Threshold tool for an image that has the Black & White Bitmap (raster) output type. (See page 34 for more about the Black &
White Threshold tool.)
Applying the default threshold
■ Click the Auto button in the Black & White
Threshold tool.• The optimal black and white threshold setting
determined by the scanning software is applied to the Black & White Threshold tool.
• The result of the change to the threshold setting can be seen in the preview area.
The Black & W
Bitmap (raster
type and a bland white throf 15 applied
�
4 HP PrecisionScan Pro User’s Guide 86
the number in the threshold field is erence Controls tab (see page 47).
Threshold 127
the Black & White Bitmap (raster)
e
(the default for
old 49
this image)
g the sharpen level to improve hen you are changing a color or hite photograph to a Black &
p (raster) image.
Adjusting images of
picturesBook Contents Index
➮
➮
Changing the black and white threshold
To bring out details in an image with the Black &
White Bitmap (raster) output type, decrease the number in the Black & White Threshold field:1 Scan a picture.2 From the Tools menu, select B & W Threshold.
The Black & White Threshold tool appears.3 From the Output Type menu, select Black & White
Bitmap (raster).
The image changes to black and white.4 Decrease the value in the Black & White Threshold
field:■ click on the left side of the slider,
– or –■ drag the slider to the left,
– or –■ type a lower number in the Black & White
Threshold field, then press Tab or Enter,– or –
■ click the DOWN spin button next to the Black &
White Threshold field.
The result of the change to the black and white threshold setting can be seen in the preview area.
The range forset in the Pref
Image with output typ
Thresh
Try changinthe result wblack and wWhite Bitma
T I P
�
4 HP PrecisionScan Pro User’s Guide 87
ite bitmaps
or channel from the Scan using
box in the Black & White Threshold
all the red in colored line art or ing printed on red or pink paper,
Red channel. The red components of n the image will be mapped to white nd blue components of each pixel ped to black. all the green in colored line art or ing printed on green paper, choose annel. The green components of
n the image will be mapped to white blue components of each pixel will
to black. all the blue in colored line art or ing printed on blue paper, choose nnel. The blue components of each image will be mapped to white and en components of each pixel will be black.
Adjusting images of
picturesBook Contents Index
➮
➮
Set color channel for black and wh
When you want to save a black and white bitmap of a picture that has been printed or photocopied on colored paper, or want to create a special effect, you can change the color channel used in the final scan.
Eliminating a color from the image
By changing the color channel setting in the Black
& White Threshold tool you can eliminate red, green or blue from the image (see page 88).1 Scan a picture.2 From the Tools menu, select B & W Threshold.
The Black & White Threshold tool appears.3 From the Output Type menu, select Black & White
Bitmap (raster).
The image changes to black and white.4 Decrease the value for the black and white
threshold (see page 86).
5 Select a colchannel list tool:
■ To eliminatefrom a drawchoose the each pixel iand green awill be map
■ To eliminatefrom a drawthe Green cheach pixel iand red andbe mapped
■ To eliminatefrom a drawthe Blue chapixel in the red and gremapped to
The Auto button in the Black & White
Threshold tool does not reset the color channel.
T I P
�
4 HP PrecisionScan Pro User’s Guide 88
annel and automatic 0)
annel and higher 73)
ray channel in the Scan using
box of the Black & White
ol converts color to gray at a red, 59% green, and 11% blue.
Adjusting images of
picturesBook Contents Index
➮
➮
Examples of changing color channels
Images of a color drawing changed to the Black &
White Bitmap (raster) output type are shown with different color channels and black and white threshold settings applied in the Black & White
Threshold tool.
Original with True Color output type
Black & White Bitmap (raster) output type applied with NTSC
Gray color channel and automatic threshold (110)
Red color channel and automatic threshold (110)
Green color channel and automatic threshold (110)
Blue color chthreshold (11
Blue color chthreshold (1
The NTSC G
channel list Threshold toratio of 30%
T I P
�
text 5
rt a block of text
ge
5➮
➮
Scanning
90 Scan and conve
93 Scan a whole pa
�
5 HP PrecisionScan Pro User’s Guide 90
r scans the selection area and the ea fills the preview area.election area to include all the ou want in the final scan (see
e final scan and the character :drop to another program (see ore Clipboard (see page 92), orfile (see page 92).
-and-drop or Copy and Paste,ve to a file.
Scanning text Book Contents Index
➮
➮
Scan and convert a block of text
A block of text can be selected in the preview image for conversion to editable, unformatted text.1 Preview scan (page 50).2 From the Output Type menu, select Text as the
output type.3 Create a selection area (see page 51).4 To enlarge the view of the selection area:
• click , the Zoom button in the toolbar, or• from the Scan menu, choose Zoom.
The scanneselection ar
5 Adjust the scharacters ypage 55).
6 To begin thconversion• drag-and-
page 91), • Copy to th• Save to a
Original Zoomed imagePreview image Dragwith selection area or Sa
�
5 HP PrecisionScan Pro User’s Guide 91
rop to another program
stination program.ocument and view the page that will image.ing software window, position the
de the selection area.
changes to .ft mouse button and drag the image on in the open document.
changes to . mouse button.
of the image is performed.
onverted to editable text and placed document.
eep the original in the same scanner glass until the final
image is completed.
Scanning text Book Contents Index
➮
➮
Drag-and-d
1 Start the de2 Open the d
receive the3 In the scann
pointer insi
The pointer4 Press the le
to its positi
The pointer5 Release the
A final scan
The text is cin the open
■ Always Zoom scan a selection area you want to convert to text, then adjust the position and size of the selection area to be sure it contains all the characters you want to convert.
■ The text in the selection area is displayed at a low resolution and may not appear readable, even after a Zoom scan.
■ During the final scan when you drag-and-drop, copy, or save the selection area, the text will be scanned at a higher resolution before it is converted to editable text.
S e l e c t i n g T e x t
Be sure to kplace on thescan of the
T I P
�
5 HP PrecisionScan Pro User’s Guide 92
e
e Save As... button in the toolbar, oran menu, select Save As..., or.
dialog box appears.
format choice in the Save as type list File (.txt).in box, choose the directory where save the text file.
ame box, type a name for the text file.
of the text is performed.
onverted to editable text.
aved to the file.
Scanning text Book Contents Index
➮
➮
Copy to the Clipboard
1 Click , the Copy button in the toolbar, orfrom the Edit menu select Copy, oror press Ctrl+C.
A final scan of the image is performed.
The text is converted to editable text.
A copy of the text is placed in the Clipboard.2 To paste the text in another program’s open
document:• Start the destination program.• Open the document and view the page that
will receive the text.• Position the pointer where you want to place
the text, then click.• From the program’s Edit menu, choose Paste,
or press Ctrl+V.
The text appears where you pasted it.
Save to a fil
1 Click , thfrom the Sc
press Ctrl+S
The Save As
The only filebox is Text
2 In the Save
you want to3 In the File n
4 Click Save.
A final scan
The text is c
The text is s
�
5 HP PrecisionScan Pro User’s Guide 93
in box, choose the directory where save the file.
ame box, type a name for the file.
of the entire area of the scanner formed.
onverted to editable text.
d images are saved to the .rtf file.rtf file, open it in a program that can h text format files.
F file opened inother program
Scanning text Book Contents Index
➮
➮
Scan a whole page
A entire page of text, or text and pictures, can be saved to a rich text format file (.rtf) that contains editable, formatted text and images.1 Preview scan (page 50).
It is not necessary to create a selection area or choose an output type.
2 From the Scan menu, select Save As Whole Page.
The Save As dialog box appears.
The only file format choice in the Save as type list box is Rich Text File (.rtf).
3 In the Save
you want to4 In the File n
5 Click Save.
A final scanglass is per
The text is c
The text an6 To use the .
interpret ric
Original Preview imagewith selection area
RTan
�
anned 6
e the image
o another program
o the Desktop
board
6➮
➮
Saving scimages
95 How you can us
96 Print the image
97 Drag-and-drop t
98 Drag-and-drop t
99 Copy to the Clip
100 Save to a file
�
6 HP PrecisionScan Pro User’s Guide 95
ing text, you can convert it to t.nformatted, editable text, see
rmatted, editable text, see
Saving scanned images Book Contents Index
➮
➮
How you can use the image
When you have scanned a picture and are satisfied with the image in the selection area, there are several ways to use the image.■ Print the image from the scanning software (see
page 96).
Printing the image from the scanning software results in a hardcopy of the image, but does not save it to the hard disk.
■ Make the image permanent by placing it directly from the scanning software into another program. When you save the document you placed the image in, the image is saved with the document.
You can place the image directly into another program using:• drag-and-drop (see page 97)• copy and paste (see page 99)• TWAIN (see page 11)
■ Make the image permanent by saving it to a file.
An image file can be created using:• drag-and-drop to the Desktop (see page 98)• the Save As... command (see page 100)
When scanneditable tex■ To save u
page 90.■ To save fo
page 93.
T I P
�
6 HP PrecisionScan Pro User’s Guide 96
ction area has been drawn, the a of the scanner glass is printed. keep the original in the same
the scanner glass until the final e image is completed.
Saving scanned images Book Contents Index
➮
➮
Print the image
1 Click , the Print button in the toolbar, or from the Scan menu, select Print,or, press Ctrl+P.
The Print dialog box appears.2 Fill out the options in the Print dialog box.3 Click OK.
A final scan of the image is performed.
The image is sent to the printer.
When you print a copy of the image in the selection area you will be able to see the size and quality of the printed image.
Use the Print command to send a copy of the image to a printer.
■ If no seleentire are
■ Be sure toplace on scan of th
T I P
�
6 HP PrecisionScan Pro User’s Guide 97
eep the original in the same scanner glass until the final
image is completed.
Saving scanned images Book Contents Index
➮
➮
Drag-and-drop to another program
1 Start the destination program.2 Open the document and view the page that will
receive the image.3 In the scanning software window, position the
pointer inside the selection area.
The pointer changes to .4 Press the left mouse button and drag the image
to its position in the open document.
The pointer changes to .
(If the pointer changes to , the destination program does not accept drag-and-drop.)
5 Release the mouse button.
A final scan of the image is performed.
The image appears in the destination program.
The image in the selection area can be dragged and dropped into another program that supports drag-and-drop.
After the image is dropped into the destination program, the image becomes part of the document file.
Be sure to kplace on thescan of the
T I P
�
6 HP PrecisionScan Pro User’s Guide 98
keep the original in the same the scanner glass until the final e image is completed. running Internet Explorer, only p file named Scan.bmp can exist
r.he Scan.bmp file with a name ts what image is in the file.
Saving scanned images Book Contents Index
➮
➮
Drag-and-drop to the Desktop
1 In the scanning software window, position the pointer inside the selection area.
The pointer changes to .2 Hold the Ctrl key down, press the left mouse
button, then drag the selection area to the Desktop or to a folder in the Windows Explorer.
The pointer changes to .
3 Release the mouse button.
A final scan of the image is performed.
A bitmap file named Scan.bmp is created on the Desktop or in the folder in the Windows Explorer.
You can create a bitmap file of the image in the selection area by dragging the selection area to the Desktop or to a folder in the Windows Explorer.
The file name for each new bitmap file after the first one created this way includes a number in parentheses.
■ Be sure toplace on scan of th
■ If you areone bitmain a folde
■ Rename tthat reflec
T I P
�
6 HP PrecisionScan Pro User’s Guide 99
image
stination program.ocument and view the page that will image. pointer where you want to place the click.ogram’s Edit menu, choose Paste, or .
appears where you pasted it.
Saving scanned images Book Contents Index
➮
➮
Copy to the Clipboard
Copying the image
1 Create a selection area (see page 51).
2 Click , the Copy button in the toolbar, orfrom the Edit menu select Copy, oror press Ctrl+C.
A final scan of the image is performed.
A copy of the image is placed in the Clipboard.
Pasting the
1 Start the de2 Open the d
receive the3 Position the
image, then4 From the pr
press Ctrl+V
The image
The image in the selection area can be copied to the Clipboard, then pasted into the destination program. After the image is pasted into the destination program, the image becomes part of the document file.
Be sure to keep the original in the same place on the scanner glass until the final scan of the image is completed.
T I P
�
6 HP PrecisionScan Pro User’s Guide 100
e (.bmp)
format used by Microsoft Windows ndows programs. This is often a ecause Windows itself and most
grams accept the .bmp file type.
x)
contains a complete image plus resolution copies of that image. The the FlashPix file format over other that a software program can select the best resolution for a to make editing and using images in ter and easier.
Saving scanned images Book Contents Index
➮
➮
Save to a file
File formats
The scanning software can save images in several graphics file formats.
Bitmap Imag
An image fileand many Wigood choice bWindows pro
FlashPix (.fp
A FlashPix fileseveral loweradvantage of file formats isautomaticallyparticular job programs fas
The image in the selection area can be saved to a file, then the image file can be inserted into another program’s document with an Insert File or Import File command.
You will need to know what file format to use when saving the file.
Not all output types can be saved in all file formats. Only the valid file formats for the output type applied to the image can be selected from the Save as type list box in the Save As dialog box.
T I P
�
6 HP PrecisionScan Pro User’s Guide 101
aphic (also called a raster graphic) y resolution. TIFF image files can be ple platforms.
ssed (.tif)
IFF files for images are smaller than e files. Images with the Black & White
output type are compressed with ression. All other output types are ith LZW compression.
.pcx)
rmat is for images used in Windows h as PC Paintbrush and Paint.
(.rtf)
File file format is used with the Save
... command to create an RTF file of a tains text or text and pictures. The text in an RTF file can usually be other programs.
tafile (.wmf)
Windows Metafile file format is ble (vector) images in Windows e .wmf file format is available for n the Black & White Scalable (vector) applied to a selection area that wing.
Saving scanned images Book Contents Index
➮
➮
GIF Image (.gif)
GIF is a compressed file format suitable for an image that will be used on the Web or on multiple platforms.
JPEG Image (.jpg)
JPEG is a compressed file format for images. Its strengths are small file sizes and speed. The trade-off for these advantages, though, is reduced image quality. Since each time an image is compressed with JPEG it loses a little of the image data, avoid compressing a file with JPEG more than once. JPEG is an appropriate file format for an image that will be used on the Web or on multiple platforms.
Text File (.txt)
The Text File file format is used for saving to a .txt file when: ■ the selection area contains only text■ the Text output type is applied■ you want the text converted to editable,
unformatted, ASCII text
TIFF Image (.tif)
TIFF is an industry-standard image file format. TIFF files are usually created by scanners and are widely accepted by programs that work with photographs and other images. A TIFF file is a
bitmapped grand can be anused on multi
TIFF Compre
Compressed Tthe TIFF ImagBitmap (raster)
PackBits compcompressed w
PCX Image (
The PCX file foprograms suc
Rich Text File
The Rich TextAs Whole Page
page that conformatting of interpreted by
Windows Me
The Microsoftused for scalaprograms. Thdrawings wheoutput type iscontains a dra
�
6 HP PrecisionScan Pro User’s Guide 102
le size
e the size of an image file in the ware by:solutione True Color output typee scale of the image a compressed file format (.gif, .jpg, ressed)
Saving scanned images Book Contents Index
➮
➮
Saving the file
1 Click , the Save As... button in the toolbar, orfrom the Scan menu, select Save As..., orpress Ctrl+S.
The Save As dialog box appears.2 In the Save in box, choose the directory where
you want to save the file.3 In the File name box, type a name for the image
file.4 From the Save as type list box, choose a file type.5 Click Save.
A final scan of the image is performed.
The image is saved to the file.
The file name extension for the selected file type is automatically added to the file name.
Reducing fi
You can reducscanning soft■ reducing re■ avoiding th■ reducing th■ saving with
or .tif comp
Be sure to keep the original in the same place on the scanner glass until the final scan of the image is completed.
T I P
�
35mm 7
adapter
7➮
➮
Scanningslides
104 The 35mm slide
105 Scan the slide
�
7 HP PrecisionScan Pro User’s Guide 104
Scanning 35mm slides Book Contents Index
➮
➮
The 35mm slide adapter
The HP ScanJet slide adapter can be used to scan 35mm mounted slide photographs.
Placing the slide and the adapter
1 Lift the scanner lid so that it stays up.2 Place the adapter next to the top edge of the
scanner glass so that the arrowhead on the adapter points to the arrowhead on the scanner bed.
3 Tip the adapter toward the scanner lid.4 Turn the slide so the emulsion side is next to the
scanner glass.5 Orient the slide with the top of the picture
directed to the top edge of the scanner glass.6 Place the slide under the notched section of the
adapter.7 Lower the adapter onto the scanner glass.
�
7 HP PrecisionScan Pro User’s Guide 105
eep the slide in the same place ner glass until the final scan of s completed.
of the ea
Scanning 35mm slides Book Contents Index
➮
➮
Scan the slide
1 Preview scan (page 50).2 Create a selection area of the part of the image
you want in the final scan (page 51).3 Zoom scan (page 56).4 Set the output dimensions (page 58).5 If necessary, make adjustments to the image
(see Chapter 4 Adjusting images of pictures
page 65).6 Save, copy, drag-and-drop, or print (see
Chapter 6 Saving scanned images page 94).
A Preview scan of the slide
Be sure to kon the scanthe image i
T I P
A Zoom scanselection ar
�
HP PrecisionScan Pro User’s Guide 106
alable type 17
reshold 7, 88
47
7
) 67
87, 88
7
r) 67
, 88
el 88
, 73
button, Scanconfiguring 12
using 10, 50
CClear Selection
command 16
clip art, Black & White Scalable (vector) output type 17